Thursday 27 October 2011

A K13a - the original commission


The original commission is completed. The prototype was designed without an adjuster, but the original commission was for a plane with an adjuster. There were several modifications to make - some minor - some major.


The obvious ones are the inclusion of the adjuster and the cap iron - but I also had to modify the sidewall profile so the blade would still be tucked behind the ‘corner’ at the top of the sidewall. I also modified the front curve of the sidewall (between the pad and the lever cap) to allow for a bit more room so the lever cap would actually fit. One other modification was to eliminate the stainless steel button in the cap iron and tap the cap iron itself. This reduced the amount of room required under the lever cap for the blade to be removed.


The handle was pushed back a bit to create more room to cover the stem of the adjuster.


The main stem of the adjuster was also shortened so it would look better with the shortened blade.


(curly African Blackwood!)


A few weeks ago, I started fitting the stainless steel lever cap. I installed the adjuster, put the blade assembly into the plane and just about barfed. I had made one of my typical cap irons complete with perfectly straight chamfered edges on the sides and across the top. It looked horrible. It was late - about 10pm. I was awful tired - but deep in my gut I knew what I had to do. I removed the cap iron, grabbed another piece of 01 and started making a new cap iron. I was a little embarrassed that I was at this stage when I caught this blunder.

The solution was a no-brainer - chamfered curves instead of chamfered strait lines. I was just about to dust off my french curves from college, when I looked down at the K13 sidewall template lying there. Huh... it might just work.


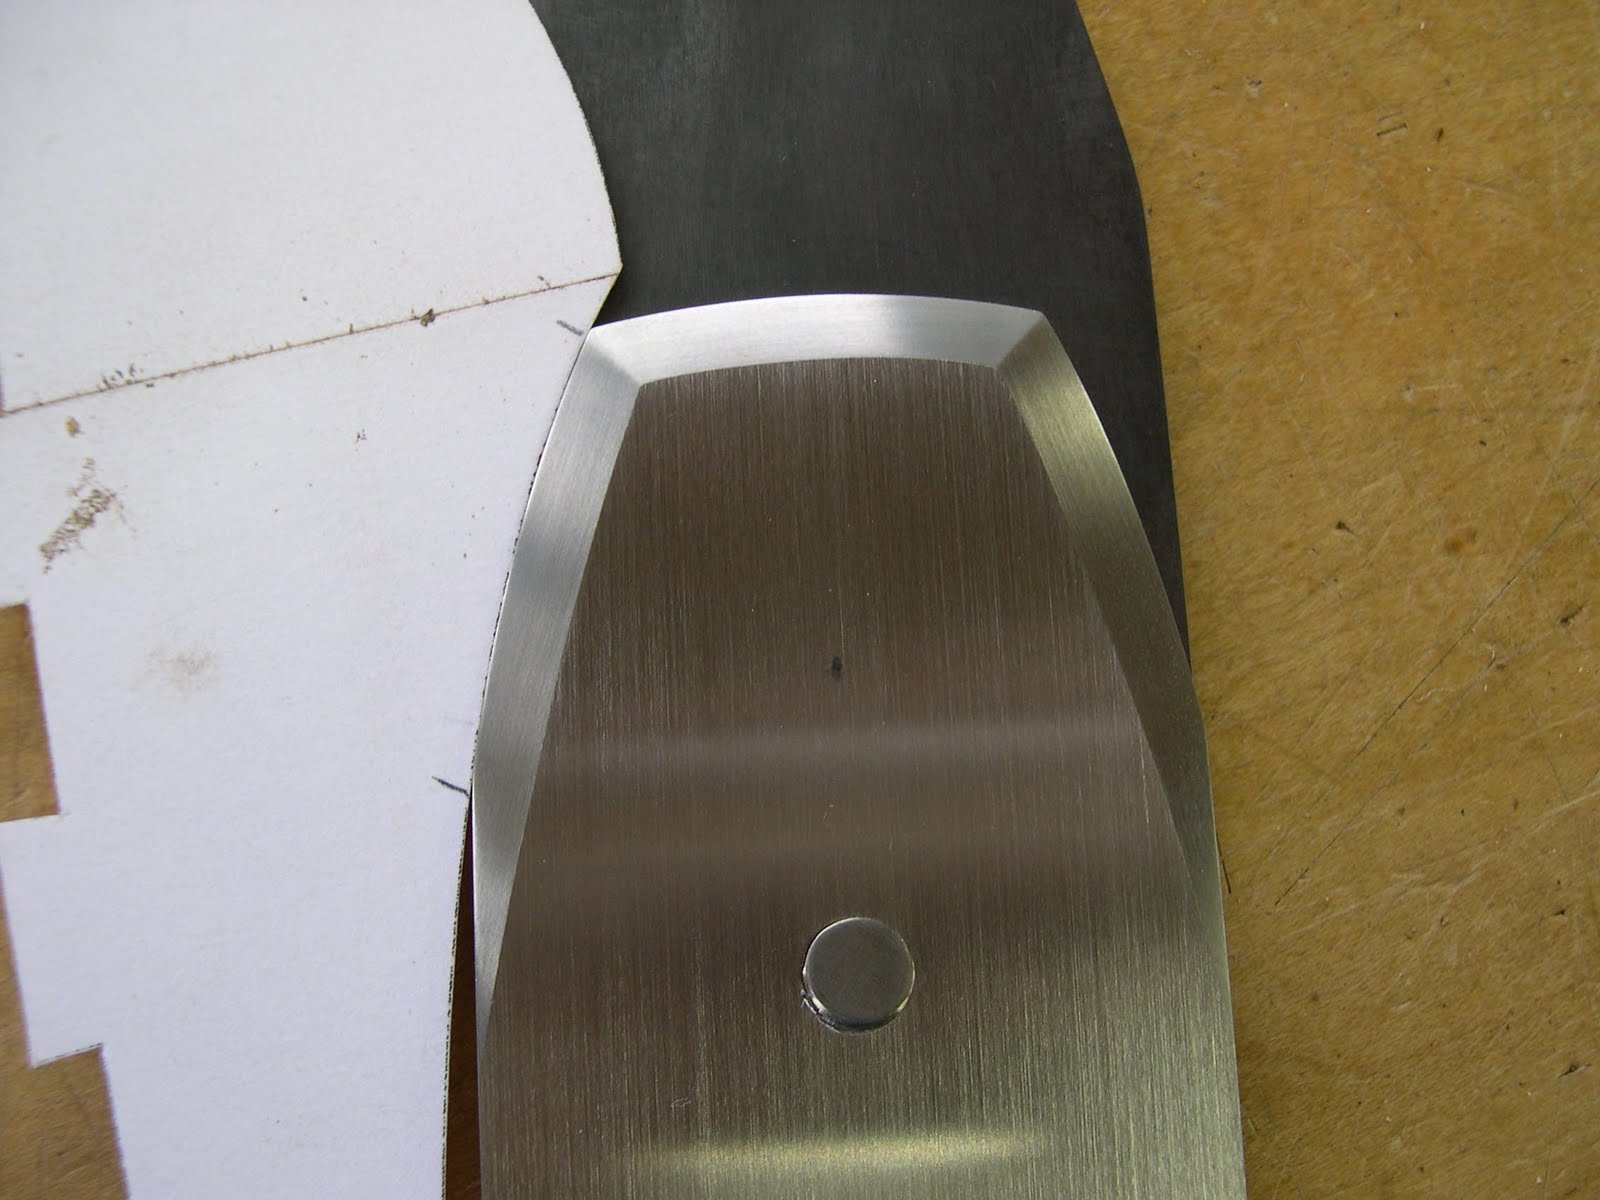
I hand drew a quick radius on the cap iron blank, and then positioned the template - looking for a segment of the sweep that matched. Bingo - there it was. An hour later - I had a new cap iron and not only did it match the plane - it actually enhanced it. No barf-bucket required.


I have the good fortune of being able to hand deliver this plane next weekend in Ottawa. I can’t wait.

Speaking of Ottawa - I will be attending another Lie Nielsen handtool event. Here are the details. Please stop by and say hello if you are in the area.


The next two K13’s are also completed. Interestingly - they are both infilled with Desert Ironwood. Here is a sneak-peek.


9 Comments:

Blogger Adrian Baird Ba Than said...

Blackwood!!!
I really love the lighter variants of the very finest Dalbergia, you can really see into the grain. I also find it works a little better than the blacker examples, more resinous, less brittle.
Purely for curiosities sake, what is the asking price for a Blackwood K13 with adjuster?
Thanks for letting Kari take the photo at W.I.A., it still makes me smile.
B

27 October 2011 at 19:53  
Blogger Richard Wile said...

Those planes look awesome Konrad, I like the Desert Ironwood more and more each time I see it, gonna be awesome in my smoother.

The K13 surely is a defining moment in your evolution as a builder and designer, the responses I have seen have been incredible. I believe the new Master is emerging...

28 October 2011 at 05:56  
Anonymous Anonymous said...

Holy crap Conrad!

That is one of your most stunning creations to date. The wood and finish are perfect for that plane.

Following this project makes me want to throw down another gauntlet before you to see what else you can come up with.

Dan

28 October 2011 at 09:15  
Blogger pjped said...

Konrad,
The icons of design that excite, inspire and move us in some way, of which there are may examples in 18th and 20th c. furniture, pre-war automobiles and boats, architecture, etc. ...now have company in your K13.

-Pete

1 November 2011 at 00:07  
Blogger Konrad said...

Thanks Black - glad you like it. This piece of Blackwood was a really rare find - I have never seen it this colorful or figured before.

Glad you like the photo from WIA - Kari and I had fun with it.

The K13a starts at $4,900.00 Cdn.

Cheers,
Konrad

1 November 2011 at 22:02  
Blogger Konrad said...

Thanks for the very kind comments Richard. The Ironwood has been getting some pretty rave reviews and I already know I am going to have to stay on top of my supply. The piece for your smoother is set aside already.

Cheers,
Konrad

1 November 2011 at 22:03  
Blogger Konrad said...

Thanks Dan - glad you like it.

Sure - add your gauntlet to the pile:) I am just finishing up a matching pair of SNo.4’s right now and I am hoping to spend a bit of time at the drafting table.

Cheers,
Konrad

1 November 2011 at 22:04  
Blogger Konrad said...

Thanks Pete - I cannot imagine a nicer comment. I am very touched and encouraged by the response to the K13 - it has surpassed my wildest dreams.

Cheers,
Konrad

1 November 2011 at 22:09  
Anonymous Pedder said...

Hi Karl,

I'm coming back to these beauties the 10th time. I admire the lines. Any chance you're coming to europe next year?

Cheers
Pedder

11 November 2011 at 06:12  

Post a Comment

Subscribe to Post Comments [Atom]

<< Home

Thursday 20 October 2011

Re-visiting weight - an A1Ti panel


Titanium sucks.

Well... it sucks to work with at least. It does not like to be cut, filed, bent, piened or lapped. If it was not for a very good friend asking me to make this - I don’t think I would have. This is not my first Ti plane - I made a small XSNo.4Ti a while ago. It was a nightmare too.


There were several reasons for making this plane. My friend is doing some extensive restoration work to a Mahogany sailboat and is working by the ocean. The sea air makes rust free tools mission impossible. He also wanted something lighter in weight. I was curious to see just how much weight could be reduced simply be changing the sole and side materials. That and the fact that the idea of a titanium panel plane sounded pretty cool.


Dovetailing the XSNo.4Ti was a total nightmare so the thought of dovetailing a plane 3 times as long felt insane. So I didn’t.

It is welded.


My friend Hugh Black from True North Cycles makes wicked custom bicycles - often with Titanium frames. He was willing to try welding the shell for me. The welded shell sat around in my shop for a few months and everyone commented on how amazing his welding job was.


As a point of reference - it normally takes me about 3 to 5 minutes to pien a typical 01 tool steel cross pin (the pins that hold the infills in place). It took at least 15 minutes to pien each end of the 3/16" titanium cross pins. I was worried they did not pien properly to be honest. I decided to switch to 303 stainless for the cross pin that holds the lever cap. There was no way I was going to risk trying to pien a 5/16" titanium pin! The 303 pin worked perfectly and while it is tight - you can see it because it is a different material.


Lapping took 4 times longer, required 10 times as much abrasive paper and three-quarters of a water cooler bottle. Half way through the lapping, I became keenly aware of just how good Hugh is at welding... the evidence was completely gone. Thanks again for an amazing job Hugh.


When all was said and done, it felt noticeably lighter than any other panel plane I had made, and I was dying to know just how light it was.

My A1 panel plane is infilled with Ebony, and has bronze sides. It weighs 3.914 Kg’s (8.629 Lbs). This A1Ti filled with Rosewood weighs 3.04Kg’s (6.702Lbs). It is somewhat shocking that this plane is a full 2Lbs lighter!

This got me thinking (again) about the weight of planes. When most people talk about infills, they usually comment on the weight and how much heavier they are than non-infill planes. This perception of weight is usually identified as a benefit, and that it adds to the plane’s function. I am not convinced that weight is a desirable thing, and - I think we are usually confusing weight with what we are actually experiencing - how solid the plane feels.

One of the things that makes an infill ‘feel’ the way it does is that there are no moving parts and the blade is so securely held by the lever cap, that the blade has no choice but to take a shaving. I would describe this feeling as solid - heavy does not necessarily factor into this. The best example of this is how a plane from Old Street Tools feels. If weight were really that important - these planes would feel horrible. But they don’t - they feel amazing to use. This is because they have some similar characteristics to infills. Namely, that there are no moving parts and when the planes bed, the blade and the wedge are precisely mated - the plane feels really solid. This solid feeling also comes from the fact that most handled infill planes have closed totes. A closed tote is not only stronger, but it also means there is no flexing when the plane is being used. This translates into improved feedback and a tactile sense of the wood being cut that is pretty amazing. I am also realizing that I wrote about some of this last year and will end before I start sounding like a broken record.

Another interesting side note to plane weight. Many people have commented that they are pleasantly surprised by how light the K13 is, and I am often asked how much it weighs. Until this morning - I have never been able to answer that questions. My K13 weights 2.704Kg’s (5.961Lbs).

Two pics added for Pete - the welded shell;


13 Comments:

Blogger Richard Wile said...

Konrad,

This plane looks as amazing as I thought it would. Being a cyclist who only rides Titanium, I really like the look and feel. The welding job was amazing but the lapping moreso, looks very smooth and clean - love that titanium colour.

On your point about solid/feel/weight, I think that the weight is definitely part of the feeling of confidence one has when using an infill; I think the weight exaggerates any tilting or movement and provides better feedback and thus control to the user. A lighter plane you do not feel its position as much, because there is less mass to feedback on - my 2 cents anyway.

21 October 2011 at 11:02  
Blogger Steve Kirincich said...

Hi Konrad,
It has been written many a time that wood soled planes glide over wood with less friction than a metal soled plane. Are there any subtle differences between the different metals you have used on your planes?

Steve

21 October 2011 at 12:22  
Blogger Chris Knight said...

What a fabulous piece of work Konrad!

I think you ad better figure out a way of making them faster - plenty of folk are going to want one...

Chris

21 October 2011 at 13:19  
Blogger Konrad said...

Thanks Richard,

Hugh did an amazing job with the welding. Most of the uneven surface was lapped out within the first few rounds - which is pretty amazing when you consider how abrasive resistant Ti is.

I agree that some weight is nice, but I do like the way a wooden try plane feels too. An interesting point about the weight factoring into the feeling of tilting over - I will pay closer attention to that next time I am doing some edge jointing.

Cheers,
Konrad

21 October 2011 at 20:00  
Blogger Konrad said...

Hi Steve,

A great question. I am not sure to be honest, but will play around with the Ti plane a bit more and see if the material feels different. I know that 01 feels very different than a cast plane - you may be on to something here.

thanks,
Konrad

21 October 2011 at 20:01  
Blogger Konrad said...

Thanks Chris,

I do have enough Ti to make a few more - and another one is already in the works.

Cheers,
Konrad

21 October 2011 at 20:02  
Blogger Pete said...

Konrad,

Very nice post, but as a hobbyist welder I'd love to see a pic of the welded shell before you worked your magic on it!

Pete

24 October 2011 at 12:40  
Blogger Konrad said...

Here ya go Pete. I hope these are helpful - they are the only 2 shots I have of the welded shell. You can click on them for a larger view.

Cheers,
Konrad

24 October 2011 at 17:00  
Blogger Matt Owen said...

That is one gorgeous plane. Not only is it beautiful, it's probably indestructable :-). As always, great work Konrad! On your next one, in-process photos would be much appreciated. Thanks!

25 October 2011 at 10:45  
Blogger JW said...

Just for the sake of stirring the pot some more...

A few years ago, I was at a class being taught by Larry Williams, and got to use some of the wedged coffin smoothers that he brought with him. After that, I started to think that the reverse is true about being able to gauge tilting and feedback.

I think it's easier to tilt a heavy plane, precisely because they're so heavy. But the advantage of the coffin smoother wasn't in the weight... it was height, and in the way the plane is held. Because the fingers sit on the vertical side of the plane, instead of twining around the handle, and because the plane was so tall, I found that it was easier to feel the plane tipping, or not, as compared to a handled plane.

27 October 2011 at 09:14  
Blogger Konrad said...

JW,

Pot-stirring is always welcome.

The issue of a heavy plane tilting is a very valid one. I agree with you in principle - but it may depend on how you edge joint your work. If you are edge jointing a rough sawn edge - then a heavy jointer may not be ideal (rough edge not square, flat or level). But if you have a mechanical jointer and use a jointing plane to get the edge perfect - then a heavy jointer may offer an advantage. When I am truing up and edge - I take advantage of a camber in the blade so I can keep the sole of the plane positively registered on the work. In this case, heavy feels like an advantage because it sticks to the surface. Trying to balance a heavy plane on a high edge to bring something into square is a bit of a nightmare and I would certainly prefer a lighter plane than a heavy one in this instance.

Your observation about a taller coffin shaped smoother is right on the money. Larry and I talked quite a few times When I was developing the XSNo.4. The additional height of the rear infill helps fill out ones hand and does help with feeling of square. It also keeps your fingers from being crunched up.

Cheers,
Konrad

27 October 2011 at 11:49  
Blogger Pete said...

Hi Konrad, thanks for adding the extra pics- I have a TIG welder and have considered welding up a shell, glad to know it's certainly doable!

It looks like he welded the inside corner as well, but perhaps didn't use any filler so that you didn't have to somehow grind that corner square before adding the infill? Or did you chamfer the bottom edge of the infil along most of the length, and leave the infill square at the heel and toe of the plane, where it's visible? I can see that he stopped welding the inside corner short of those areas.

Thanks again,

Pete

27 October 2011 at 13:16  
Blogger Konrad said...

Hi Pete,

Glad they helped.

The insides are welded as well - and the welds were deliberately kept away from the visible ends and inside the mouth. The infills were chamfered on the edges to fit around the welding, but were left square on the ends so it looked right. Good eye!

Cheers,
Konrad

27 October 2011 at 16:06  

Post a Comment

Subscribe to Post Comments [Atom]

<< Home

Sunday 9 October 2011

Dining room furniture in the rough

Over the years, a few people have commented that I must have a horseshoe when it comes to finding really great wood. The truth is, that horseshoe has everything to do with not leaving a single stone unturned and following every single lead no matter how unlikely it might seem.

Every once in a while I will do a lumber search on kijiji just to see what is out there. I found an ad for live edge walnut slabs. There was an email address and a phone number. No prices, no photos and a location I had never heard of before. But it had a 519 area code - which is the the same as mine, so I figured it could not be that far away. So I sent off a quick email to inquire about the walnut. A few hours later the phone rang and I spoke with the seller. Mostly flitch cut walnut, mostly 8/4 or thicker and a price too good to be true. Only 35 minutes away too. So I called two friends who might be interested to see if we could make an outing of it.

A friend of mine makes live edge furniture and has been looking for good walnut for almost 2 years now. When I called him and gave him the details, he reminded me of the old adage that if it sounds too good to be true - it usually is. He also shared that he had been on about a dozen of these lumber scouting trips in the last year and everything was crap. His last comment was “... but you never know”, and with that, we set out.

When the door to the barn opened - we knew this was not crap. In front of us were stacks of flitch cut walnut trees - some 16' long. It was all we could do to keep calm. We must have looked like ants on sidewalk bubble-gum as we swarmed around the various flitches.

It was my friend Wayne who spotted what would turn out to be a spectacular find. Wayne has been harvesting his own furniture wood for several years now and has insight into sawn lumber that I do not have. I always learn a tremendous amount from him. He called me over to a skid of 8/4 sawn walnut and said “this is what you need for your dining room”. He then told me to pick up one of the boards on the top of the stack. It felt twice as heavy as any walnut I have ever encountered. I quickly put my moisture meter on it - 10% - it was pretty dry. And then the zinger - despite the poor lighting, you could make out a bit of curl.We quickly tore into the entire stack and quickly realized we could shut our eyes and tell by the weight of individual boards which ones came from the same tree. In the end, over half the stack had been pulled out... all incredibly dense and full of curl. 223 board feet in total.

On the drive home Wayne explained to me that this must have been a very old tree. Partly because of the weight (and density) of the boards, but also because of how it had been cut. You could tell from the marks on some of the boards that this log was split with a chain saw first and then cut on the mill. His explanation - it must have been massive if the mill could not handle the whole log.


The stack of curly walnut. The widest board is 22" across, most are well over 12". They are all just under 7' long.


It was only after returning home that I realized just how amazing this walnut was. It did not look like our typical black walnut. There was tremendous color in it - blacks, purples reds and golds - it looked like Claro to be honest.


The next morning, I took one of the smaller pieces and ran it through my jointer to get a better sense of what it looked like. The photo below is the most accurate color wise - it was taken outside in natural light.


There is an ironic twist to this tale. I had initially inquired about the walnut as a possible material for our much needed dining room furniture (chairs, table the whole 9 yards). Chairs scare the pants off me - and I am gearing up to face this fear and build some mock-ups. When I was initially given the price for the walnut, I realized I could afford to use it for the mock-ups (I too was not expecting much for the price being asked). The problem is - I still need to find some 8/4 mock-up wood.

Totally unrelated - thanks to everyone who commented on the blog or who sent an email with regards to the mystery test plane in the previous post. The feedback was great and I will be preparing part II in the coming weeks. But before that happens... there will be a post about an African Blackwood filled K13a and a A1 panel plane with a titanium body.

8 Comments:

Blogger Richard Wile said...

Having seen this wood in person, it truly is as spactacular as Konrad attests, man I wished I lived closer, I would have some of this also. As heavy as white oak easily, I have never seen walnut this heavy.

10 October 2011 at 06:51  
Blogger mckenzie said...

Looks like claro to me. That wood is in mighty fine hands, can't wait your design.

tyler

11 October 2011 at 17:13  
Blogger Kev said...

Konrad did you and your posey clean up all this Walnut or is there any left? The trouble with curly walnut is to match the curly with the non curly in your design.I'm sure you will do a bang up job, and I'm looking forward to the finished photo's

Kev!

12 October 2011 at 17:39  
Blogger Stuart Page said...

Hey Kon long time! Just wanted to say WOW! to two things - first your walnut stash (GREEN with envy!) but more importantly your K13 Widowmaker ;-) What a BEAUTIFUL plane!! I checked out Schwarz's blog video and man only you could have pulled that off. It looks (and sounds) like it functions INCREDIBLY well (which is a wow in itself) but you've turned infills into an effing Corvette! (the '50's classic, not the horrible later ones) Congratulations amigo, I wish you orders galore! Love to Jill and the kids, Stuart

13 October 2011 at 09:05  
Blogger Konrad said...

Hey Tyler,

I have been enjoying the walnut and Wenge Credenza’s - very nice.

Cheers,
Konrad

21 October 2011 at 20:06  
Blogger Konrad said...

Hi Kev,

Nope - lots left:)

cheers,
Konrad

21 October 2011 at 20:06  
Blogger Konrad said...

Hey Stuart,

Long time indeed! Nice to hear from you.

Glad you like the K13. You will just have to make another trip to 21 Maynard for some football, a pint and another day (or 4) messing around in the shop. We will have a clean set of cutlery waiting for you:)

And you can check out the ever growing piles of lumber. I am most certainly going to need some off-site storage soon.

Best wishes,
Konrad

21 October 2011 at 20:10  
Anonymous LaZBoy said...

Thank you for going over the process of building quality dining room furniture. Its interesting to see its inception from raw slabs of curly walnut towards its completion. Great read.

10 December 2012 at 09:52  

Post a Comment

Subscribe to Post Comments [Atom]

<< Home