
Handle fitting in 2 piece infill
Reader directed blog posts are a great. I have mentioned before that
generating content is becoming increasingly challenging. I am reluctant
to start recycling earlier topics, but it feels like I am at a point where there is not much ‘new’ to say. So questions or requests from readers
are extremely helpful.
This post was initiated by Owen and a few others expressed interest in it as well - so here goes.

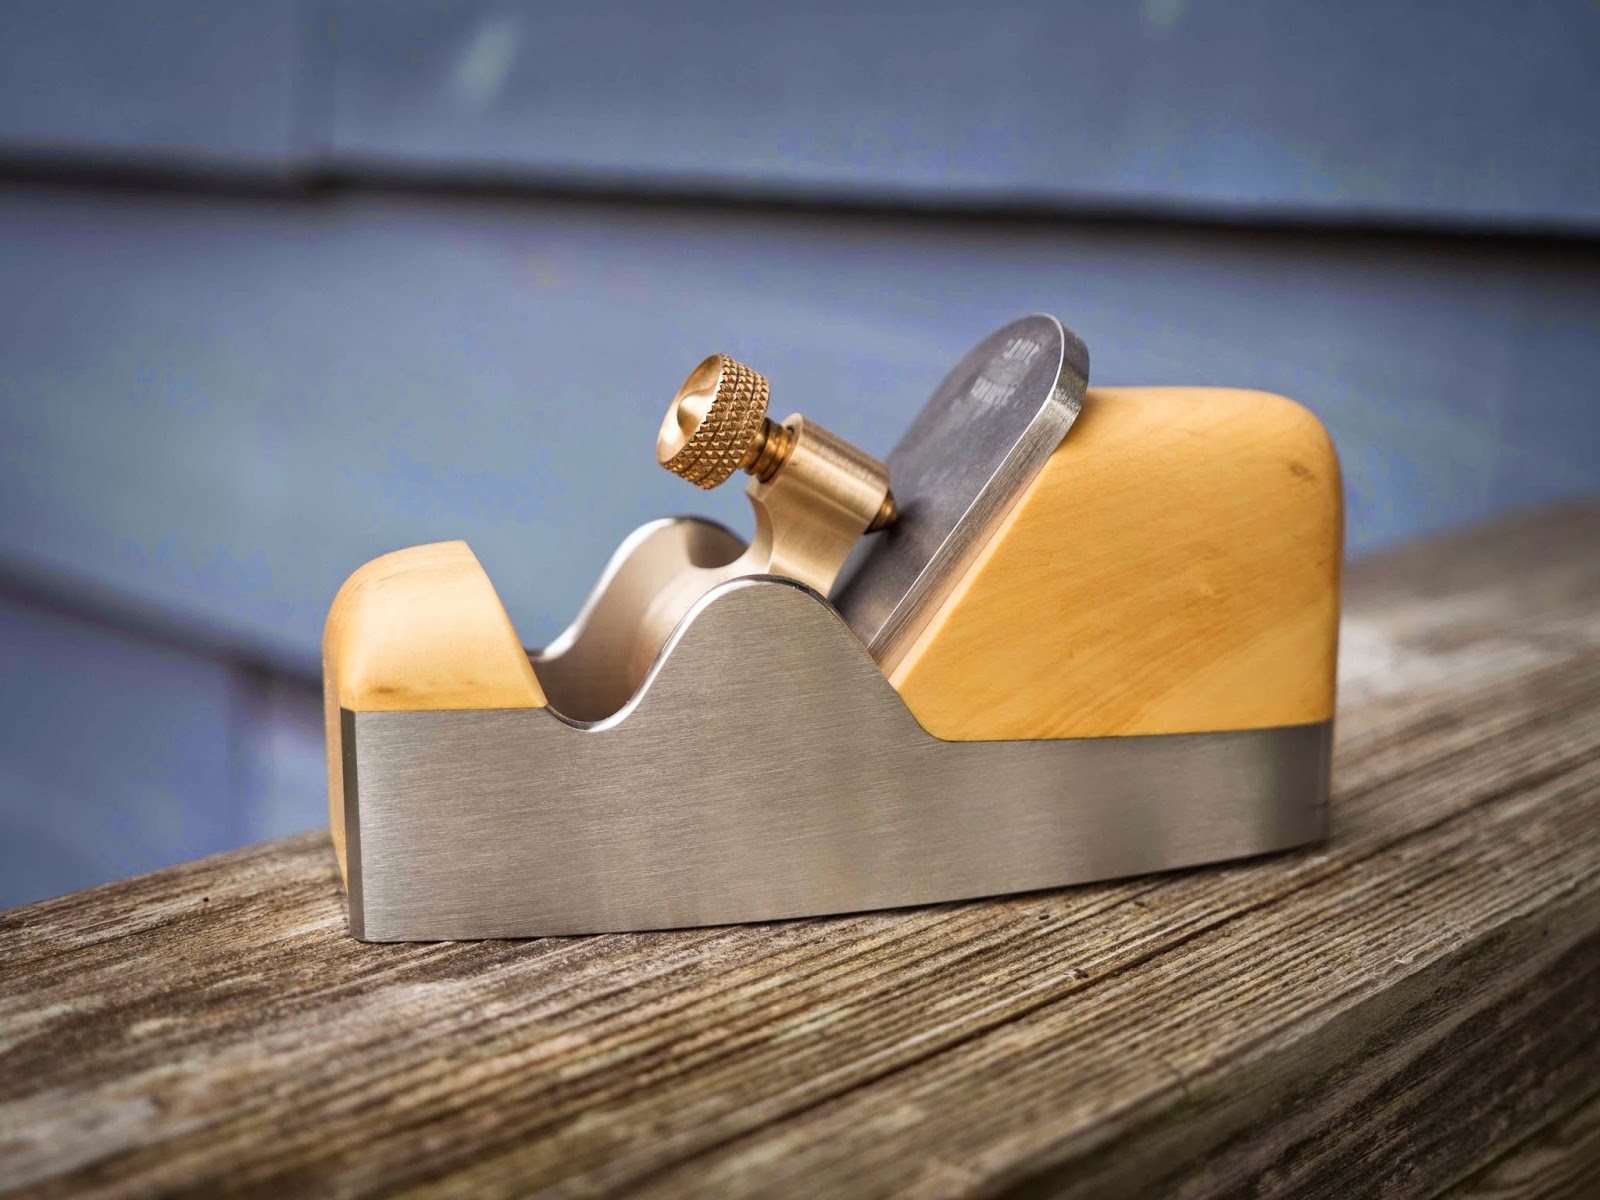
The question has to do with construction and fitting the handle into the rear infill of a large plane. The rear infill is a single piece of wood and the handle is a separate piece of wood. The handle is mortised through the rear infill right to the bottom. I have seen many original Spiers and Norris planes where the handle is not fully moritsed into the rear infill... and the fact that I have seen this points out the flaw of this approach - they often come loose. They were usually just glued in - without the additional strength of a cross pin - which is shocking really. I always have 2 pins pass through the handle - it just strikes me as good, sound, mechanical strength.
I make a square mortise in the rear infill and then fit the handle to the mortise. The mortise is sized a little smaller than the handle blank - usually by less than .0010". Once the rear infill is fit, I start fitting the handle.
Oh, I should preface this entire process by saying that I am not a militant numbers guy. I do not work in such a way where a handle would fit into another plane - it will only fit the plane I am working on. I have zero interest in making a pile of metal pieces and a pile of wood pieces and have them be able to fit with each other interchangably. I would rather gnaw my arm off than work that way! I don't need to have all the handle blanks be 1.120391" wide - I rough out a handle to somewhere between 1-1/8" and 1-1/16" wide and put it on the shelf until it is needed. But... I do use calipers all the time because the fit between 2 parts does require paying attention to the numbers. I don't care what the specific thickness of the handle is - but it has to be consistent at each corner to within 0.001". I hope the difference makes sense.

These previous 2 shots show the handle slipping into the rear infill. I should also mention that the fit between these parts is incredibly tight. The rear infill is just a pressure fit, but is good enough that it could support the weight of the metal shell if lifted. Even at this stage, the handle could also support the weight of the shell and rear infill if lifted.
With the handle bank to the correct thickness, I can now mark the notch at the back of the handle. This struck me as the best approach to dealing with the rounded back of the handle - have it overlap the rear infill as opposed to try and cut a precise radius in the rear infill. I am shaping the handles freehand and don't want to have to bother to worry about the precise radius I file - this process allows me to work the way I want to.

The shot above shows the cut-out notch. At this point, I fit the handle fairly close and will make adjustments to the notch so it rests quite flush with the rear infill. I do not worry about final adjustments until the handle has been shaped though - no point in fitting areas that will be filed off in the shaping process.

Here is the handle roughly shaped - and the files I use to get there.


With the rear of the handle roughly shaped, I now start to fine tune the fit between the rounded back and the deck of the rear infill. I use chisels and files to fine tune the fit until there is no gap between the handle and rear infill. The shot above and below show what it looks like.

The next 2 shots show the handle fully shaped, sanded and placed in the rear infill as a final check before gluing. Please click on any of the images to get a larger view.


I use polyeurathane glue for a couple of reasons. Firstly, it has a long open time. Secondly, it has no gap filling properties - so it forces me to work very precisely. Thirdly, it was originally designed for gluing Teak and none of the woods I work with are that oily so I figured it would be a good choice.
The shot above shows a small curl of glue being chiseled away. Click on this image to see a larger view to show the fit between the handle and the rear infill.

A final shot of the rear infill with the glue squeeze-out cleaned up.
I hope this helps Owen - and thanks for the topic suggestion.
posted by Konrad at
07:40
18 Comments
![]()


18 Comments:
Great post! A couple of questions: what scribing tools do you use in fitting the lower edge of the handle to mate with the surface below, and do you glue the lower piece in place against the metal?
Hi Tico,
Not 100% sure I understand your question, but I think you are asking what tools I use fit the underside of the handle that rests on the top of the rear infill. I use a Blue Spruce marking knife and both graphite and white pencils for marking high spots etc. I have an articulated lamp positioned behind the plane that will show a light gap quite easily. When there is a gap, it is pretty easy to look to see where the high spot is. I use chisels initially, but depending on the species of wood and the grain, I will switch to a file to get the fit just right.
There is no glue used in any of the wood to metal contact points. The cross pins are all that hold the infill in place. You could drill out the pins, pop them out and pull out the infill.
cheers,
konrad
Hi Konrad,
Have you ever shown any of your early efforts at plane making? You certainly have no shortage of admirers, but I am going to guess that you needed some time and missteps before you became very proficient.
With your impressive collection of old, exotic wood, do you have any good wood collecting stories? This will probably make Raney incredibly jealous!
Steve
Wow - Really can't say how much I appreciate you taking the time to show us every little detail we want to see! Amazing that you're able to do work of this quality and still take the time to walk us through it.
Also, have to thank you for something else - can't remember what posting it was, but I think you linked us to a Chris Schwarz article about somewhat of an All Star Planemakers showdown. Ironically, after a very fair review of each amazing plane... the post ended with a somewhat "hey, whatever works" vibe, in reference to Krenov's plane, which had the bed packed out with blue tape. (Btw - I think you might have been the only maker to get away without any real criticism - pretty good!) Anyhow, after some thought I decided if it was ok on Krenov's plane, it was ok in mine - and taped up all my wooden planes to get within a couple thou. Much quicker than re soling (although I'll do it eventually) and the performance has skyrocketed. This also brought another question to mind - I was bugging you about chipbreakers as well... In your experience, is it possible to have the breaker too close to the cutting edge, or is it better the closer you get, right up to the edge? (assuming of course you're not on or in front of). I'm experimenting, but experience comes so damn slowly sometimes.
Thanks again Konrad, and if you ever are struggling for content - I think we would all be happy to just see more pictures of the shop! I go through craigslist postings, forum pictures, instagram, whatever - looking in the background of people's furniture shots - just to see how they organize things. I noticed you're bench is fairly clean, with just that sweet rack of chisels, and usually a plane or two off to the side. I'd love to see what you keep for planes, I assume there must be some rather large cabinet or something packed to the gills?
Cheers,
Owen
Hi Steve,
Thanks for the reminder - there have been a few requests for early plane photos. The next post will be photos - with all the glorious failings:)
Let me think on the wood collecting stories - there are quite a few of them to be sure.
cheers,
konrad
Hi Owen,
You are most welcome - glad it was useful and informative.
The link to Chris's article was likely the planemaking gathering in 2005 if I remember correctly. At the time, I don't think any of us really recognized the importance of that gathering - in hindsight - it was pretty bloody amazing. At the risk of destroying my own business... 'whatever works' is pretty accurate. There are lots of good planes out there - in a wide variety of styles at a wide variety of prices and from a variety of makers. Not everyone connects with infills and that is totally cool - not everyone needs to. At the end of the day, if you have a tool that you enjoy using, that inspires you to do your best work, that you find comfortable to use and does the work that you ask of it - you don't need to look any further. Save your money and buy the best quality wood you can and make something amazing and beautiful with it.
Glad the tape worked so well on your wooden planes. I think I still have an early infill with a brass shim double sided taped to the back of the blade.
I am not sure if it is possible to get the chip breaker too close - I would imagine the leading edge of the mouth might start factoring into things - and affecting the ability for shavings to exit. Let me know what you find out.
Pictures of the shop... I think I can swing that too. Funny thing - I usually take all the shots in the shop at f1.4 thru f2.8 to keep the backgrounds blurry so they are not distracting.
My plane collection is a little embarrassing - if I check the serial number listing, I have made myself 44 planes over the years. Many of the early ones don't see the light of day, but there are several drawers that are pretty packed. Maybe I can roll this into the next blog post as well. One other funny thing that a good friend of mine suggested was doing a type study of my own planes. My personal planes are all the prototypes of almost all the various models so they are the best examples to use to show the evolution(s) they have gone through. This would take a bit of time to organize and figure out, but it might be of interest.
Cheers,
konrad
That was fascinating!
Any chance you could show/tell how you french polish? I am familiar with french polishing large, flat surfaces, but wonder how you accomplish the required motions on small, tight, curved surfaces.
You mentioned this once before, but is a book (picture book) in the works? Maybe like the one from Bridge City Tools? That would be very cool.
I didn't know you were looking for content! I suppose at the risk of putting words in other woodworkers' mouths - as woodworkers we are interested in any and all the minutia of construction of your planes. Obviously, you should only reveal things you think are ok to share - we don't want your business destroyed either!
As with many things, I personally like to try them myself at the outset - I have a surplus of time and not of money at the moment, so I like to try these things as they come up. For example, when renovating my own home in 2008 I gutted a bathroom and replaced the drywall - I will never mud drywall again. I'm not good at it and have no desire to become good at it. MY guess is with my current attempt at a shoulder plane, I'll likely never dry a smoother or jointer - I'll leave it to the pros and be all the more awe-inspired by there work because now I have even more context to appreciate it.
I'll also say to not worry so much about recycling content. Yout blog archives only go back to 2007 and I was under the impression that you've been in business a few more years than that. I don't know if you blogged in those early years but I'm sure if you did your perspective on the content from experience has likely changed dramatically. And not all of us have been following you since the beginning.
I'd also be curious about some of the "extras" on the plane - and by that I mean simple things like how the screw is made, or even the chipbreaker.
I also appreciate your thoughts on design and what inspires you. Seeing you drool over a Porsche says a lot about where your influence comes from! You should also link to the youtube video of you at Fluxible.
Awesome posts, I am always fascinated by the level of fit and finish you get. I look at mine, and cannot believe you go it that tight and perfect.
Here would be my request: Video of you doing some of the shaping on the handle. Many of us seem to argue with files and rasps, and I think seeing the movement patterns of a master would help very much in trying to get the right body language and movement.
Thanks Robert - glad you enjoyed it.
French polishing is something I am asked about somewhat regularly. I really do need to take some time and explore the video capabilities of my camera because french polishing would be much easier to explain with video as opposed to still images. I will see what I can do.
The book idea has been bouncing around for a very long time. One of the challenges is narrowing down the focus to something cohesive. A beautiful coffee table book with lots of great photos would certainly be fun and satisfy the ex-graphic designer in me... but I am not sure if it would feel complete. There is a part of me that is interested in talking about plane making and all that it involves - but also a somewhat chronological account of how Joe and I got started and how everything came to be. I suppose a chronological account could also include a lot of details about the actual plane making as well. It also feels a little strange to contemplate writing a book before I am finished making planes. If I had written it 3 or 4 years ago, it would have missed the entire K-series of planes - and that would have been a major omission. If nothing else though, a good reminder to at least start taking notes and recording some of the early stuff before I forget it all!
Cheers,
konrad
Hi Nathan,
Thanks for the encouragement to include the minutia - there is certainly a lot of it in planemaking!
Drywalling - boy, I have done my fair share of it too. I have gotten fairly good at it. I am not fast, but I have gotten to a point where I only do one light sanding at the end. One of the best things I did was take a day off work and watch a professional plasterer mud drywall. He was an Italian trained craftsman, but was struggling to find work doing proper plastering so he ended up doing a fair amount of drywalling to make ends meet. I took a day off and watched him work - it was well worth it and I still use many of the techniques I learned from him. But yeah... drywalling kinda sucks... and the dust... that really sucks!
I think I have a series of photos of making a chip breaker, but if not, it should be easy to capture.
The Porsche thing has been an interesting subject. I am amazed at how many people have sent me notes about their own Porsche's or how they too lust after them. There are lots of other areas of inspiration - I will keep a running list and maybe start adding in the odd 'inspiration No.___' post here and there.
Hmmm... you found the Fluxible video. I have to say, I was quite nervous about watching it. I really enjoyed that event and the feedback was very positive, but I was a little worried about watching myself - hoping there were not any cringe worthy blunders. I waited about a week before even opening it, and then watched it at midnight after everyone was fast asleep. Totally dorky I know.
cheers,
konrad
Thanks Paul. I went back into my photo archive to remind myself of your plane. Man, that was a pretty sweet piece of Rosewood!
Yeah - I am with you on the video front. I am somewhat embarrassed about the fact that my shop camera is extremely capable of video and I have yet to really explore it. Keep reminding me - and kick me in the pants if need be. Handle shaping would be a good one to show - as would setting the blade on a plane, using an adjuster, and... the list goes on and on.
cheers,
konrad
Also your sharpening set up!! (and that would be an awesome video too) I love seeing different peoples, because I don't think I've seen any that I consider perfect yet.
Owen
Also Konrad, if you don't mind - I bought my first piece of ebony the other day. Was quite surprised that it worked pretty nicely!? I thought it would be too much for my little planes. Anyhow, it's a little turning blank that I'm going to build a smoothing plane out of. Just thought I'd check as I think you work with it more than anyone I know - type of glue you prefer? I have a bunch of titebond polyurethane leftover from a job in Ipe - have you used this stuff? success? also, do you wipe down lightly with acetone or water before gluing? Hope you don't mind me treating you as an encyclopedia - just don't want to screw this thing up.
Cheers,
Owen
Hi Owen,
Your piece of Ebony - I am assuming it was labeled Gaboon Ebony? Were the ends waxed or was the entire piece waxed? Do you have a moisture meter that allows you to adjust for gravitational density? What I am getting at is figuring out how dry it is. Most Ebony sold now is quite wet - even if they advertise it as 'kiln dried'. My experience with testing 'kiln dried' Ebony is that the MC is usually between 14% and 18% - far from dry. Bring the piece into your shop (heated and fairly dry? - do you have a hygrometer?). Let it sit for a month or so. Then, scrape off the wax from one of the long sides and let it sit for another month. Keep a really close eye on it - if checks develop - mark them with white pencil crayon and watch it like a hawk. If checks do not develop (sigh) after another month, scrape off the wax off the opposite edge. Wait another month. Then do a third side, wait a month, then the last side. With the sides done - then remove the wax from the ends. Hopefully, the piece of wood does not check during any of these steps. Write the date on each of the sides and make notes of any checks etc.
What are the dimensions of the piece? Ebony is pretty notorious for checking as it dries (sorry to say). It does work quite well - although extremely messy and the black dust will stain everything - you will look like a coal miner! I have never wiped it down with acetone when gluing it. I would get a fresh bottle of glue - just to be safe (if you have to glue any pieces together). I have had good success with Gorilla glue but any of the titebonds would be fine too - it does not need to be a polyurethane glue either.
If the Ebony feels really soft when you are working it - like a really hard, but pleasant Walnut, and feels fairly light weight, it might be Madagascar Ebony. This Ebony has become 'unobtanium' in the last several years, but it is the Ebony that everyone thinks of when they imagine Ebony - jet black, very easy to work with, and polishes to a stunning coal-like black. It was used for Piano keys, all sorts of wind instruments, the fingerboards of early Martin guitars and many, many woodworking tools. Gaboon Ebony is usually very brown when placed next to it. If you take a pocket knife and cut into the edge of the square, it will flake like frozen butter if it is Madagascar Ebony - Gaboon will feel quite hard and you may not be able to cut it at all. It will give you a sense that you knife might slip even if it is very sharp. That is Gaboon Ebony.
hope that helps.
cheers,
konrad
Oh boy. Devastating. Although an important lesson I suppose - rookie mistake to think I was going to buy a piece of wood and dive right into it. I called back the place I bought it from and it's apparently indian... (diospyrus ebenum).
It was a little 3" x 3" by 12" block, only waxed on the ends. And it came in at bloody 30% MC. It also already has a small check in the end that I was hoping to be able to get rid of, but I'm pretty worried now. It was the only block in the pile that wasn't totally ruined by checking. Also, in my haste, I wanted to see how bad the check was, and whether I would be able to clean it up and get my 2" blade - so I've already surfaced it all 4 sides...although I didn't touch the wax yet. How bad is this sounding? I've left it at my friends shop, as he has a much better setup and keeps his heat regulated - I still don't have heat in my shop yet. Do you think I should try to shellac or oil it or something to undo some of the damage I've probably done by milling it and exposing fresh wood?
How long do you think I'll be waiting for this thing to come down from 30% ? 6 months - year?
Man it's tough starting out - very envious that you are well into your cycle so you have stuff you can work with while you wait :-P
Thanks again for all your help, it's very much appreciated.
Owen
If it is any consolation Owen - every one of us has run into this at some point - it is inevitable.
Shellac the sides you dressed and see what happens. It will still dry with the shellac on it - but it will slow it down. 30% at 3" thick will take about 30 years. I know that sounds insane - but it was the 'rule' I was given by a very good friend who is a retired furniture maker who specialized in working with exotic woods (Rosewoods and Ebony). The general rule is 1 year per inch of thickness for air drying domestic woods - his rule for exotics was 10 years per inch of thickness.
If you know what you want to do with it, you could cut it down into fairly close dimensions (oversized 1/8" would be good) and then shellac it and let it sit on a shelf. No point in waiting 30 years for the full 3" to dry if you only need a 2" piece.
cheers,
konrad
As the neutral (American) spokesman for the Canadian Organization Dedicated to Preserving the Country's Ways of Doing Things As Well A Few Best Practices, I wish to express our group dismay that a promising candidate who otherwise would win many of our highest honors has chosen to miss the deadline for the age at which all Canadian citizens must attend their first NHL game.
We will discontinue any further discourse if no further mention of this distressing behavior appears on these page.
Post a Comment
Subscribe to Post Comments [Atom]
<< Home