Tuesday 26 January 2016

an unconventional lever cap


It has been a while since I have made a lever cap from scratch, but given the complex geometry and really odd final shape needed for the badger plane, it was the only option. Besides, sometimes going back to your roots can be a lot of fun.

I had made several test lever caps for the first badger plane, so I was not starting totally from scratch. One of the wooden mock-ups fit the new badger plane quite well - well enough that I could use it as a pretty accurate template.

The reason I am posting these photos, is to show a process and a methodology using very simple workshop tools and woodworking techniques. Starting with a rectangular block of metal and turning it into an accurate, complex shape. I have often joked with people that metal is just a strange wood with strange properties, and this lever cap is a perfect example of that mindset.

I made a set of card stock templates from the wooden model and transferred them to the blank.


 You can see the outline of the lever cap scribed on the blank.

I am often asked why on earth I do so much of this by hand. The reason is fairly simple - I look at all the hand skills as having a cumulative effect. One skill leads to another which impacts another. Taking the time to hand cut all the dovetails for our kitchen drawers was really over the top, but it was another lesson to teach myself how to ‘feel’ when I am sawing level and sawing accurately. It is such a simple thing, but the time taken for all that work has had a tremendously positive impact in many other areas of work - including the shaping of this lever cap. I do not need a reference line on the opposite side - I don't need to stop sawing to check if I am close to the line - I just know where it is, and when it feel right. That sense is transferable to filing as well - and all sorts of other aspects to plane making and woodworking.


The outline of the lever cap, and the waste below.


It also helps to treat yourself to a brand new hacksaw blade.


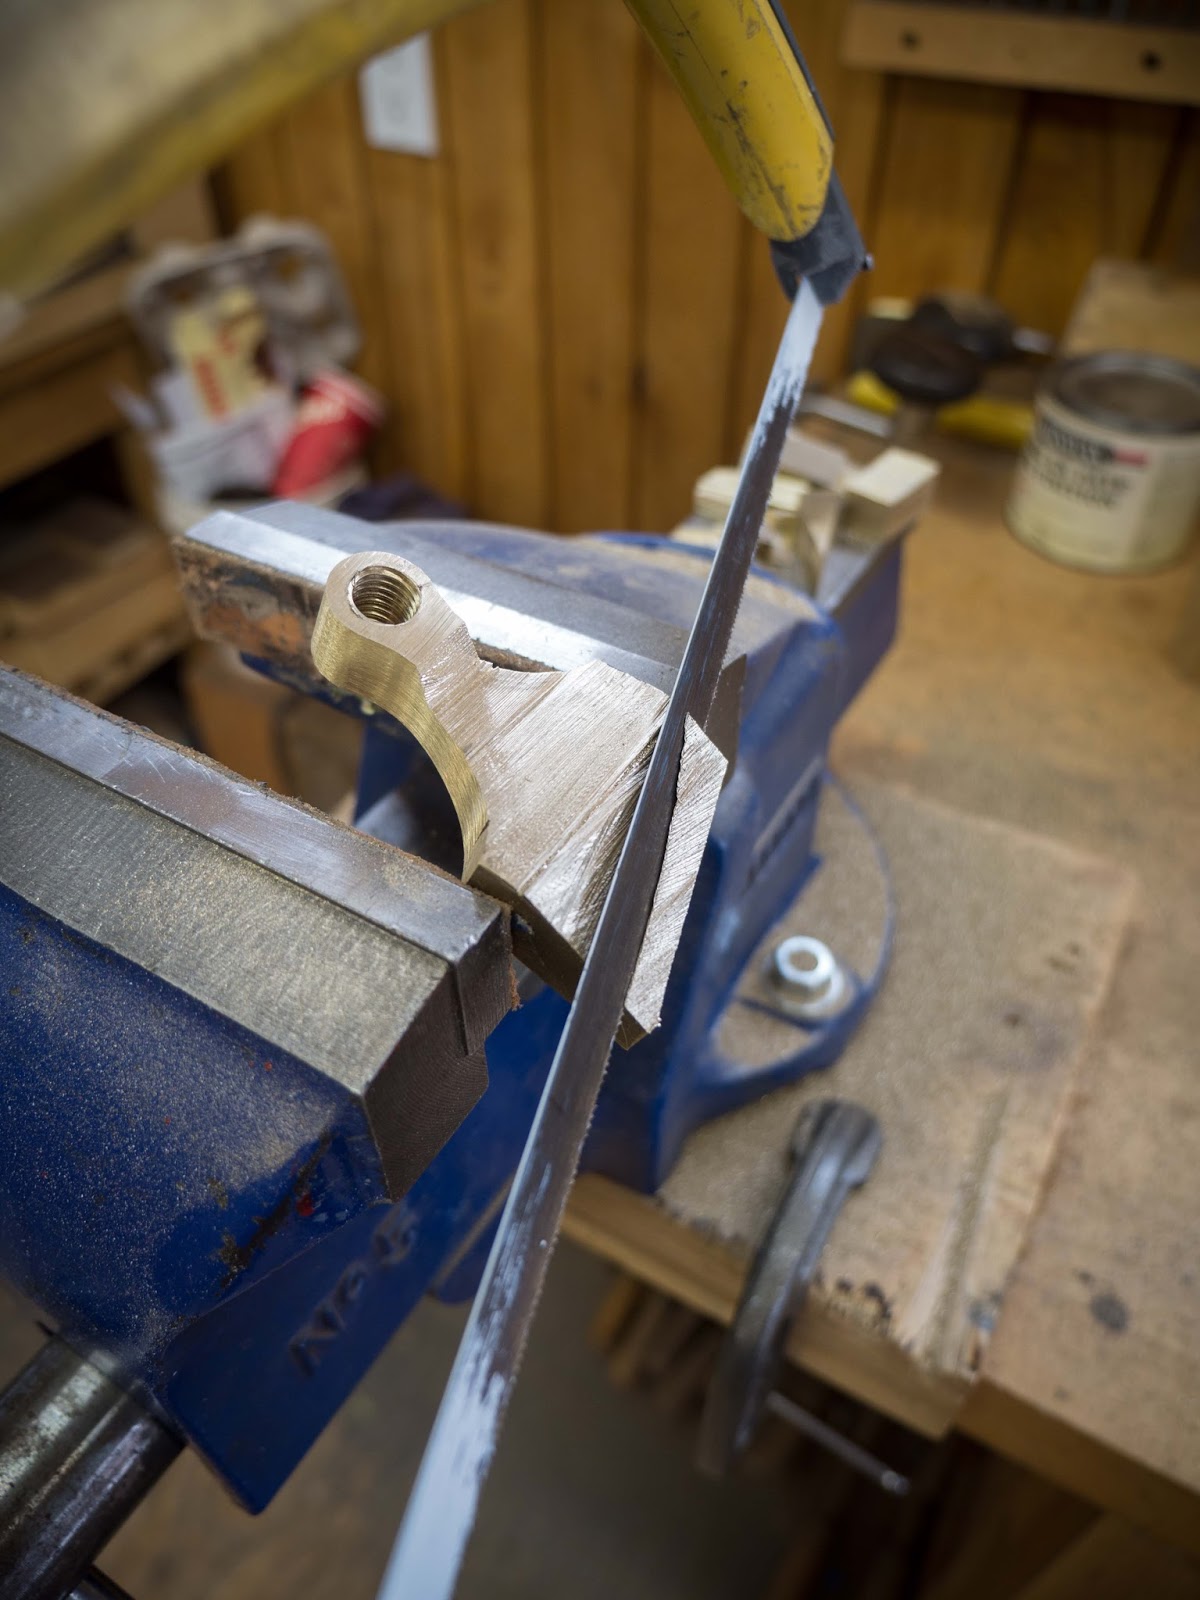
I cut the outline first to waste out as much material as possible. This greatly reduced the amount of sawing for the profile. I drew the profile with a sharpie and cut some vertical kerfs,


and then started cutting the profile. Just like using a chisel to cut a small notch in a piece of wood to register a saw blade - I saw a small kerf to give me something to register against for such a shallow cut in metal. 


Taking 1/16" off the height here is way easier now that the outline has been defined. 


I only cut part of the profile so I would have more area to clamp while tapping the hole for the screw. The flat surface also gives me a reference face for checking 90 degrees.


Once the screw was fit, it was time to shape the other half of the profile. The two sharpie lines represent the two different shapes on the sides of the lever cap. They are quite different reflecting the dramatic rotation of the lever cap in the plane. 


I cut the angle of the lever cap first - again, to reduce the amount of sawing during profiling. Wasting off this angle was a more efficient way for me to work. If you click on the image, you can see another benefit of hours and hours using a hack saw - being able to saw very close to a line. This greatly reduces the amount of filing later on.


Sawing thin, tapered slices to reflect the two different side profiles and the rotation of the lever cap.


The (rough) profiled lever cap. 


At this point, the top surface of the lever cap has been fully shaped by way of files. I need the profile to be the final shape in order to accurately start fitting it into the plane.

I measured the angle on the wooden test model and transferred it to the lever cap, took a deep breath, and started sawing. With each cut, the risk increases dramatically. I did not cut exactly on the line for this cut - I left about 1/32" so I could further refine the angle during the fitting process.

The fitting process is a lot of back and forth, lots of direct lighting for clarity, and careful file work. I used a wooden hand screw in the blue vise to position the edges of the lever cap level. Positioning things level and/or plumb is always worth the extra few seconds of time, and allows you to take advantage of the muscle memory you have built up.


The screw was a little too long so I cut it down and re-shaped the tip.


A much better screw length.

The next few shots show the odd angles of the sides of the lever cap as well as the overall wedge shape. 


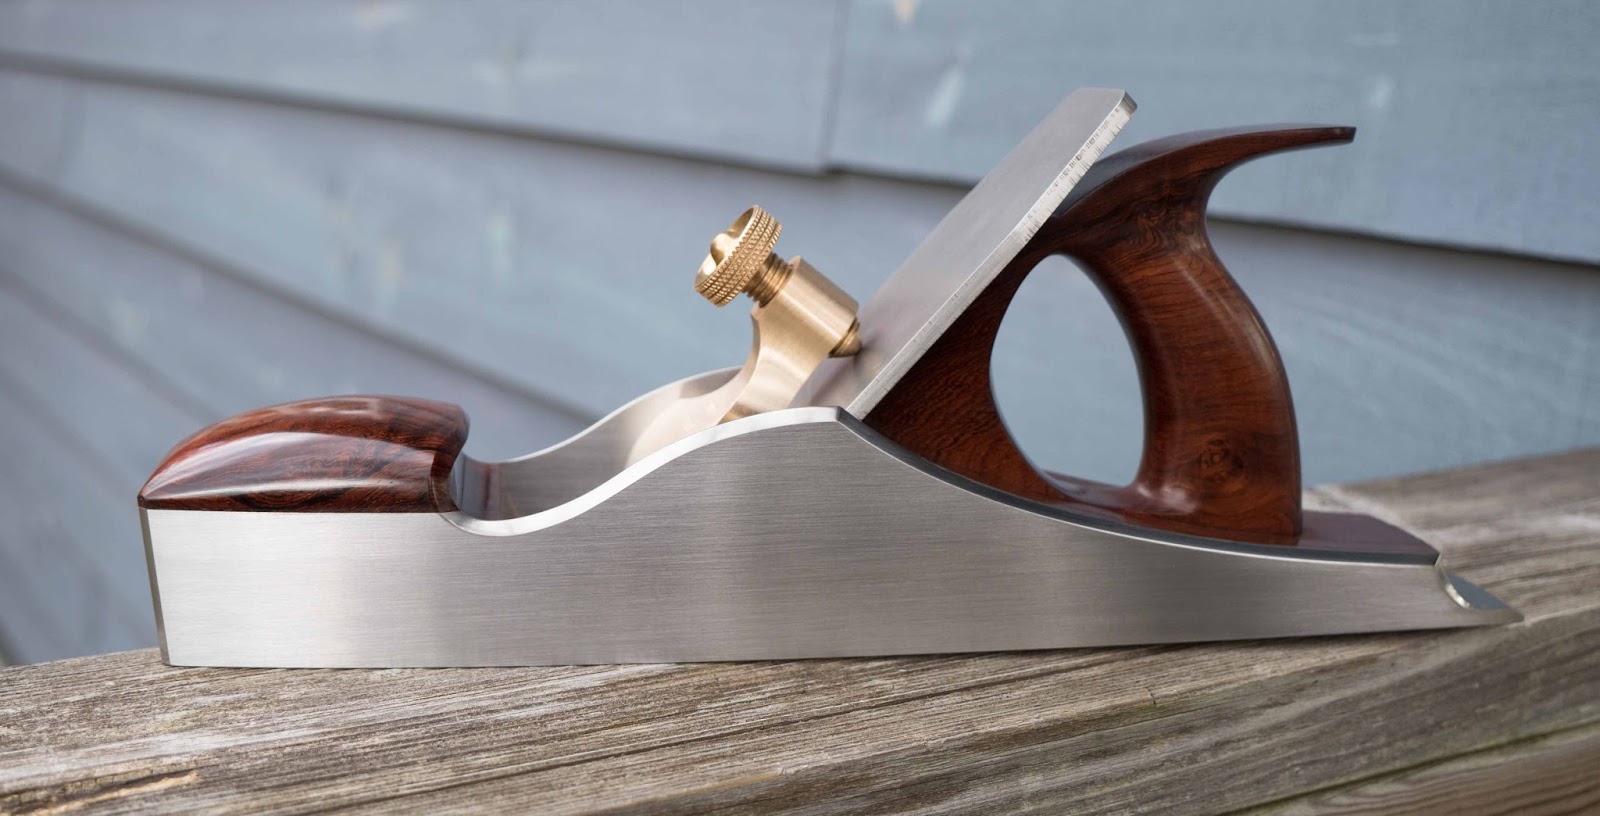
The lever cap fit to the plane. The next step is to drill for the cross pin, and I have to confess.... this is going to require a few antacids.  


6 Comments:

Blogger Unknown said...

IG just doesn't do this process justice. It's one thing to register 90 degrees to another surface but quite another to make such a complex shape by hand and have it all fit perfectly. This should confirm why hand work is so important and machines have no sole.

Attempting to draw out the shape in a CAD program then setting up the CNC machine to make the various cuts would have taken far longer and I would suggest the results would not have been as nice.

Every woodworker should experience the thrill of effortlessly pushing a S&S custom hand made plane across a piece of ill behaved exotic wood. The sensation is so intoxicating you just might think it's illegal.

Now my mind is consumed by thoughts of selling as many tools/body parts/etc. as possible just to get my name on the list of lucky owners. BTW, this feeling is still with me from Handworks.

26 January 2016 at 15:14  
Blogger Konrad said...

Thanks Mike,

I was wondering if anyone from IG would wander over here! Nice to see a familiar name, and now I know who the maddog really is:)

Glad you enjoyed the post and that it was worth posting in addition to IG. IG is pretty new to me, and I am still adjusting to the speed of light response times.

Thanks too for the kind words and glad that feeling from HandWorks is still there. It is a tough one to shake... look what happened to me:)

best wishes,
konrad

26 January 2016 at 22:45  
Blogger Kevin Brehon said...

Do you get your bronze for the cap in bar form? and if so, where?
Kevin

29 January 2016 at 09:27  
Blogger Konrad said...

Hi Kevin,

Yes, it was in bar form - you can see the chunk sitting on the bench beside the plane in the first shot. You can order it from a place like the metalsupermarket, or in my case, call your friend Stan who has all sorts of off-cuts like this:)

cheers,
konrad

29 January 2016 at 09:30  
Blogger Steve Kirincich said...

Hi Konrad,
I feeling like I am looking at some funky modern art. I think this plane belongs next to the MIT Stata Center:

https://en.wikipedia.org/wiki/Ray_and_Maria_Stata_Center

Thanks for blogging!

Steve

29 January 2016 at 16:24  
Blogger Konrad said...

Hey Steve,

Thanks for reading the blog.

I guess by that description, it would be a 'deconstructed lever cap' :)

cheers,
konrad

29 January 2016 at 16:26  

Post a Comment

Subscribe to Post Comments [Atom]

<< Home

Monday 18 January 2016

an unconventional blade assembly


Last year, I started working on a plane that I honestly did not think I would ever have the chance to make again. I was thrilled when I was asked, and have been psyching myself up for it. It is by far, the most complicated plane I have ever made. Another badger plane.

The photo above shows the ‘revised’ blade. 


The sides of the blade needed to be ground to 15 degrees to allow it to rest properly against the edge of the tapered sidewall. I re-ground the edges on the grinder shown above, and re-ground the bevel on the other wheel of the grinder.


Getting close to establishing the new bevel. 


Once the blade was re-ground, it was time to start working on the cap iron. I decided the easiest way to do this was to install the cap iron and use the blade as a visual guide for cutting the sides off. Having the blade in place was a great visual cue for the correct angle and it also kept me on my toes! 


In order for the blade to ‘fit’ in the plane, the inside of the sidewall needed to be filed to allow the blade to exit to the outside corner of the plane. On the first badger plane, I relived the corner of the cap iron so I did not need to thin out the sidewall any more than I needed to. I did the same thing on this second badger plane. you can see the sliver of steel being cut off in the photo above.


Here are the re-ground blade and re-shaped cap iron. 


 After rounding over the front edge of the cap iron, I draw file it to further refine the surface. There is a noticeable change to the surface texture of this area - from coarse ‘push’ strokes, to very smooth draw filed strokes. A little sandpaper wrapped around a block and it is all polished up.


Here is a shot of the business end of the blade and cap iron assembly. You can see the 15 degree angle on both sides of the blade as well as the relieved corner of the cap iron (on the left side). 


The blade assembly in position. Next step... the lever cap.

I should mention that I have dipped my toe into social media. Instagram to be specific. And it is not really like dipping your toe... more like grabbing onto that large knotted rope tied to the tree at the lake and swinging... without really knowing what you are in for. Things really clicked for me when I started thinking about Instagram as a short form version of a blog.  And a blog, this blog, as the long form version. I am finding myself thinking about both formats quite a bit, and should be able to use one to help the other and visa versa. I have posted a few photos on Instagram about the badger plane, but this is a better format for a step by step process and for more in-depth information. At least, that is how I am approaching it now.

4 Comments:

Blogger Kevin Brehon said...

I'm curious how you managed to hack saw the blade. Was it annealed or was it a special blade in the hack saw? I tried to do that once and the blade went dull within a few strokes.
Kevin

21 January 2016 at 08:19  
Blogger Konrad said...

Hi Kevin,

Wondered if anyone would ask:) Embrace waterjet my friend - it is a real life saver... and hacksaw blade saver.

cheers,
konrad

21 January 2016 at 08:33  
Anonymous Robert said...

Konrad:

I probably missed it, but I couldn't find your instagram link. Any chance you could post it in the reply?

Best regards,

Robert

22 January 2016 at 07:17  
Blogger Konrad said...

Hi Robert,

sauer–and–steiner.

The dashes are underscores.

cheers.

22 January 2016 at 08:08  

Post a Comment

Subscribe to Post Comments [Atom]

<< Home

Friday 8 January 2016

Last plane of 2015 - and a few others


The last post was about using texture to help file the mouth on a K18 - here are some photos of that finished plane. This was the last plane of 2015 and is a sibling for an earlier K9 and K13. It was the perfect way to end my year. All three planes came from the same piece of unidentified Rosewood.


The next plane is a Desert Ironwood filled K7. I have done a 180 with regards to sapwood - at least with Desert Ironwood. I am a little surprised actually - I can recall making a fair amount of noise about not liking sapwood on planes... but there is something about the coloration, texture and grain of Desert Ironwood that turned me around. I guess this dog is still learning a few things.


A Honduran Rosewood filled K13. This set is a match to my own K18. It is always interesting to be able to work with specific pieces of wood again. There were several points where things felt very familiar - when I was shaping the handle and the front pad on this plane. In hindsight, I wish I would have taken a photo of it next to my K18.


And last, but certainly not least, is another Desert Ironwood filled plane. This one is a No.4 smoother with a 2" wide blade and bronze sides.


Maybe part of the attraction of working with Desert Ironwood is the randomness of it - and the many happy surprises that happen along the way. When I roughed out the infill set for this No.4, I had no idea how the sapwood and heartwood would interact together, but when I sliced off the front of the bun on the bandsaw and saw the little island of heartwood... I was elated. I was so careful about not removing too much material so the island would be lost.


Happy New Year everyone, and thanks to you all for the continued support.

19 Comments:

Blogger Unknown said...

Wow. Are either the K7 or the No4 available? Thanks for your time and all you do.
Adam

8 January 2016 at 23:44  
Blogger Konrad said...

Hi Adam,

Sorry, all of these planes were commissions, and are at their respective homes.

cheers,
konrad

8 January 2016 at 23:52  
Blogger John said...

This is a compliment under the guise of advice: you should stop making planes on commission and instead just make the ones you want, putting each of them up for auction as they are finished. You might see some vigorous bidding. I say that because I had the same thought as Adam: Can I buy one of those? I'd wager, you could have had the two of us offering bid after bid.

9 January 2016 at 01:14  
Anonymous Anonymous said...

I am a fan of sap wood myself. I installed a walnut floor in my kitchen using it. There are some amazing patterns created. It looks as though you planed the locations on the planes. You do some amazing work. I wish you the best in 2016 and beyond. A friend from Wisconsin. John

9 January 2016 at 09:45  
Blogger Steve Kirincich said...

Hi Konrad,
Have you ever made a hand plane where the toe and heel are one type of wood and the tote a contrasting wood?

Steve

9 January 2016 at 13:16  
Blogger Konrad said...

Hmmm... an interesting suggestion John. I have started making a few spare planes now and again over the years and it has always worked out well. Let me think on it.

cheers,
konrad

9 January 2016 at 18:57  
Blogger Konrad said...

Hello John in Wisconsin. I do a fair amount of planning when I am roughing out infill sets, and things often go according to plan - but with figured desert Ironwood - you never really know what you are going to get. I have had a few happy accidents and a few disasters. Thankfully - all the disasters happened when I was roughing the sets out and not after the infills have been installed and cross pinned! That will be a very dark day when that happens!

All the best to you as well in 2016.
konrad

9 January 2016 at 19:01  
Blogger Konrad said...

Hi Steve,

I have not made a plane with different species of wood before. I have seen many examples of this, but they are rarely to my taste. I have learned enough to know never say never... but this one would be a much bigger stretch than learning to love sapwood... I think :)

cheers,
konrad

9 January 2016 at 19:02  
Blogger David Barron said...

Beautiful!

10 January 2016 at 17:59  
Blogger David Barron said...

Beautiful!

10 January 2016 at 18:00  
Blogger Konrad said...

Thanks David - Happy New Year!

10 January 2016 at 18:02  
Anonymous Dave Beauchesne said...


Konrad:

Spectacular, as usual - the lines always looks so - - flawless.

I too am a sucker for sapwood - you have captured it very nicely indeed.

Happy and prosperous 2016!

Dave B

10 January 2016 at 22:13  
Blogger Konrad said...

Thanks Dave, and Happy New Year to you as well.

cheers,
konrad

11 January 2016 at 08:15  
Anonymous Robert said...

Konrad:

The knife maker Bob Kramer sells all his custom studio knives through an auction platform - not the ones he has designed for companies that are mass produced - but those that he himself makes. Could be a model for your thinking about the auction method.

Best,

Robert

11 January 2016 at 13:27  
Blogger Konrad said...

Thanks Robert. I do not know Bob Kramer, but have admired his work for a very long time. I did not realize that is how he was selling his custom work.

Cheers,
konrad

11 January 2016 at 19:37  
Blogger Jameel Abraham said...

These planes, the display of craftsmanship,the design,the materials as a complete expression bring joy to my life. God bless you Konrad Sauer.

14 January 2016 at 23:32  
Blogger Konrad said...

thanks Jameel, for your very kind words.

15 January 2016 at 07:09  
Blogger Chris Bame said...

WOW !! That is a stunning group of planes Konrad. Your wood pile never ceases to amaze.
Have a great new year.

19 January 2016 at 23:01  
Blogger Konrad said...

Thanks Chris - have a great new year as well.

cheers,
konrad

20 January 2016 at 10:58  

Post a Comment

Subscribe to Post Comments [Atom]

<< Home