Monday, 8 February 2016

minding the gap - introducing the K8


There has been a gap in the K-series line-up for some time. A friend and customer pointed it out last May at HandWorks, and with a wry grin, asked where it was. Yup - gauntlet down.

After the shorter and higher bed angle K9, I had new insights into developing a K8, and it seemed like the logical time to do it. The K8 has an 8" sole footprint and a 1-7/8" wide blade. Not a standard width, but this is about as wide as is practical for anyone with small to medium sized hands. The wider the plane gets, the more open your hand is (on the rear infill). When your hand is too open, it can fatigue quite quickly.

There were a few subtle design changes to developing this plane, but the language has already been established, and I am very familiar and comfortable with it now.

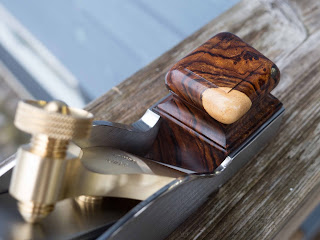
This is the K8 prototype, and is one of only two that I have parted with. When Joe and I started Sauer & Steiner toolworks in 2001, one of the founding principals was we were always going to be ‘making our own planes’. We started making planes because these are what we wanted to use - and that is as true for me now as it was then. But I have quite a few planes. Well... (almost) too many planes. I have 40 prototypes -8 of which are unhandled smoothers. It was time to let one of them go. I may live to regret it, but it is going to a good home, and will be well cared for and used more than I will likely be able to use it. And I make these planes to be used. I love seeing photos of them years later when they are full of dust, patina and even the odd ding or dent.

I cleaned up the french polish that inevitably runs over the steel sidewalls, and took a few photos to send to the customer and for my own records. Here they are.


Oh, the infill is Desert Ironwood.

6 Comments:

Blogger nbreidinger said...

I love how the sapwood seemed to curl perfectly on the front bun. Beautiful work as always.

8 February 2016 at 11:55  
Blogger Konrad said...

Thanks Nathan.

cheers,
konrad

8 February 2016 at 12:42  
Blogger Chris Bame said...

Now I have to save for a K8 too!! Nice planes as always Konrad.
So tell me… would the third Badger plane be boring : )
Went back and read your first posts to catch up on the Badger. Amazing !!!

8 February 2016 at 17:42  
Blogger Konrad said...

Thanks Chris.

A third badger!? Yikes! I hadn't even considered it. If I were to entertain another badger plane, I might want to re-think the design and make a K-series badger... but that would be a major undertaking. Damn... you planted the seed though:)

cheers
konrad

8 February 2016 at 21:04  
Anonymous Teguh said...

Nice wooden design for unique craft.

14 February 2016 at 08:36  
Blogger Kevin Brehon said...

Now everyone will want a swoosh on their plane.

14 February 2016 at 09:23  

Post a Comment

Subscribe to Post Comments [Atom]

<< Home

Thursday, 4 February 2016

finishing the badger plane


It is a good thing I never throw anything away - especially jigs or fixtures. I do not recall how long it took me to come up with the above fixture the first time, but boy, was I ever grateful I could just grab it off the shelf this time! 


This set-up may strike terror in most machinists. It is a furniture makers approach, using furniture makers tools. Sometimes, it is a real advantage to not have any formal training. I had taken extensive photos of building the first badger plane, and used those images to double check my set-up for the second one. I was pleased that they looked almost identical when I compared them on the laptop.


The cross pin fit perfectly, but I was not out of the woods yet. Just as I was sliding the pin in, I realized I had to pien it. Now normally, piening a cross pin is pretty easy - the pin is perpendicular to the anvil. When you strike the end of the exposed pin, the other end is on the anvil, allowing the struck end to deform and fill the chamfered hole. Not so much with this plane. The pin is at a pretty severe, compound angle, so the force of piening does not transfer the same way. I modified how I piened it and it ‘felt’ and ‘looked’ like it should... but I wouldn’t really find out until the lapping was done.


The cross pin for the lever cap piened.


Needless to say, I lapped this plane as soon as I possibly could. I had to know if the lever cap pin was done correctly. Thankfully, everything came out as expected.


Even positioning the plane to file the mouth felt odd. It looked pretty weird, and I had to be very aware of the tapered shape of the inside of the front bun. I covered it in blue tape just in case. 


The finished mouth.


I am really pleased with how this plane has turned out, but my absolute favourite part is using it. Similar to a spill plane, it creates beautiful tightly coiled shavings. They spill out over the low dip in the sidewall... almost like it was made for it.


(Walnut, Rosewood and Holly)

13 Comments:

Blogger jon said...

What exactly is the purpose of a badger plane anyway? I'm thinking it would make a great panel raiser. As always, amazing work Konrad!

4 February 2016 at 12:27  
Blogger nielscosman said...

Best spill plane ever!

4 February 2016 at 13:33  
Blogger Unknown said...

Same question as Jon. What's the best use of a Badger/spill plane? Looks like a skew rebate... but 1 sided. Panel raising, tuning tenons, rebate?

4 February 2016 at 14:30  
Blogger Konrad said...

Thanks Jon.

Good question, and one that I have to admit, I am still not entirely sure how to answer. It reminds me of the difference between a traditional infill shoulder plane and rebate plane. The difference between them is the bed angles (28 for rebate and 20 for shoulder) and a shoulder plane is not a rectangle in profile. That is about it. I suspect a badger plane was a bit of an anomaly in the history of plane evolution, and was around for a fairly short period of time. They are quite rare when compared with most other styles of planes - even highly specialized ones.

A badger is ideally suited for getting into the corner of a rabbet. The severe skew really helps push the plane into the corner of the rabbet. The blade needs to be rotated in order for it to exit one side of the plane. What has always confused me a bit though, is why not just make a rabbet bench plane, like a Stanley No.10? That way you are not limited by handedness or grain orientation? The skew is certainly an advantage, but it would be tough to choose between a skew with only one side being able to get into a rabbet vs a straight blade that could get into a left or right rabbet. There would have been skewed shoulder planes available, but they were not handled and were narrower. If you were doing a lot of work where you needed a wider cut, a handle would be a welcome addition.

The badger would work wonderfully as a panel raiser too, and I suspect that is how it was used along with very large scale frame and panel work. There are very few infill badger planes in existence, and the one I used for a model was by far the most elaborate and well executed I have seen.

hope that helps a bit.

cheers,
konrad

4 February 2016 at 22:22  
Blogger Konrad said...

Thanks Niels. I still have the plane for another week before I ship it, and I can guarantee I will be making piles and piles of shavings with this one before it goes:)

Cheers,
konrad

4 February 2016 at 22:23  
Anonymous Dave Beauchesne said...

Wonderful as usual Konrad - -

Your ' ride along ' tutorials are excellent, even at that, few mortals could pull off what you are able to accomplish.

I am an extreme sucker for sapwood ' accents ' well done sir!

Dave B

5 February 2016 at 08:05  
Blogger Konrad said...

Thanks Dave.

Glad you are enjoying the ride alongs. It is a bit of a running joke among a few friends that I have done a 180 when it comes to sapwood... so far limited to Desert Ironwood, but they remind me that my foot is now in the door:)

cheers,
konrad

5 February 2016 at 09:46  
Blogger Unknown said...

Hi Konrad,
Great work as always. Not sure how you or your clients might feel about it - but was thinking it would be pretty cool if they were up for sharing some of the work they do. There must be more than a few people doing some amazing work with your tools - often I wonder just who it is who gets to use these tools, and what they make with them!? Actually I've been pretty stoked to see a few sauer&steiners popping up on instagram, which is what got me thinking.
cheers,
Owen

5 February 2016 at 21:12  
Blogger Konrad said...

Thanks Owen.

A good idea, and one I have thought about many times. I have received countless photos from clients over the years sharing their work. It is incredibly rewarding to see something I have made being used to make incredible things. The issue that always trips me up is their privacy. There is a contingent of the woodworking world that looks down on people who commission custom made (read, 'expensive') tools. It has always struck me as odd because many of those same people aspire to also build beautiful things. Not tools but furniture. Two sides of the same coin. Anyway - there are certainly some clients who would be totally cool with it - those who have revealed themselves on IG for example, but there are many others that are not interested in being beaten up due to a lack of understanding. I hope that makes sense, and if you can figure out a way around this, I am all ears.

cheers,
konrad

6 February 2016 at 10:09  
Blogger Charlton Wang said...

Very nice Konrad. I've always been intrigued at how you make your planes and this is a nice insight into the process. I like the picture of the picture in the Macbook. :)

6 February 2016 at 14:07  
Blogger Konrad said...

Thanks Charlton - glad you enjoyed it. Nice that someone recognized the Macbook:)

cheers,
konrad

6 February 2016 at 22:20  
Blogger Unknown said...

Ah, I figured it would be a bit of an issue, and there probably isn't really a work around. It's awesome to see them showing up on instagram, but I imagine there are a pile of amazing older guys that are too busy building beautiful stuff to bother with IG.
Really a lame argument for the people who want to find the negative... do you not want the best chisels? planes? sandpaper? whatever floats your boat? Especially if you're hoping to convince clients to shell out for hand cut dovetails, or exotic timbers that we all love working with.
Oh well. Happy to see the planes as they go out.
Cheers,
Owen

7 February 2016 at 00:07  
Blogger Unknown said...

The spill plane was developed to create shavings that could be used as we would use a match today. Lighting candles, lanterns and pipes from the fire.

20 April 2016 at 17:28  

Post a Comment

Subscribe to Post Comments [Atom]

<< Home