
Bullnose planes from castings

Several years ago (6 actually) I had the good fortune to be able to purchase 5 unused bullnose plane castings. They came from England and looked to be extremely well done. They were in very 'original' condition, complete with the sprue and the usual sand casting surfaces.


As soon as I took a close look at them, I realized these were going to be an awful lot of work. Not wanting to rush into anything, I set them out on my window sill. And there they sat for years. Periodically, someone would ask if I have ever thought of making a bullnose plane and I told them yes, and that I had a few castings, but was not ready to take them on.
One of the hurdles was my interest in applying a steel sole. This was very common for bullnose planes from Norris and I always felt that if I was going to use these castings - I wanted steel soles as well. It makes a lot of sense to me - the steel will last much longer than the bronze, not to mention it looks pretty dang awesome. Enter my friends Stephen White and Sandra Dunn. Two Smiths is the name of their business - Sandra a blacksmith and Stephen a copper smith. I ran into them at the Heart and Hands festival at the Joseph Schneider Haus this summer and we got talking. I am not quite sure how we got on the subject, but it quickly became apparent that I had found the perfect people to talk to about how to attach the steel sole. The process is sometimes called 'sweating on' a sole. You use silver solder to attach the two pieces of metal. Stephen had done similar work before, but this was a new application. With fingers crossed - we went for it.

(heating up the casting and steel sole)
I prepared one of the castings for the prototype plane. This involved flattening the sole and squaring up the sides. This required a tremendous amount of filing. Not that I don’t do a lot of filing - but this was different - I did not really have a great reference surface to start with (the sides were a little wonky) and had to establish the sole. It also became apparent to me that there were extremely good castings and over the course of a couple hours, I watched all the rough sand cast surface disappear and reveal a perfect pit-free plane. Phew!
The piece of steel had to be flat and free of rust oil dirt or other crud.
The process is to apply a very thin layer of silver solder to one side of the steel and then to the sole of the plane. The casting is then placed on the steel and re-heated until the solder melts and joins the two. Sounds simple... but like most things, was much more complicated in the end. And this is where Stephens experience was worth its weight in gold. The first plane came together quite well and after washing off the flux I had a promising looking bullnose plane.


(the bottom view of the steel sole)

The next step was to cut off the excess steel around the perimeter of the plane.

I was pleasantly surprised to see that the sole of the plane was just about flat front to back and side to side. This suggested that minimal solder formed a lake in the middle of the plane and that both the casting and the piece of steel stayed quite flat during the heating and cooling processes.

I inverted the plane in the vise and quickly removed the high spot in the middle by draw-filing it. In truth, I actually created a bit of a hollow which was fine with me - it meant I was less likely to create a compass shaped sole when I went to lap it. Lapping is much easier when the perimeter is 'high'.

Lapping the sole and re-lapping the sides went very well.

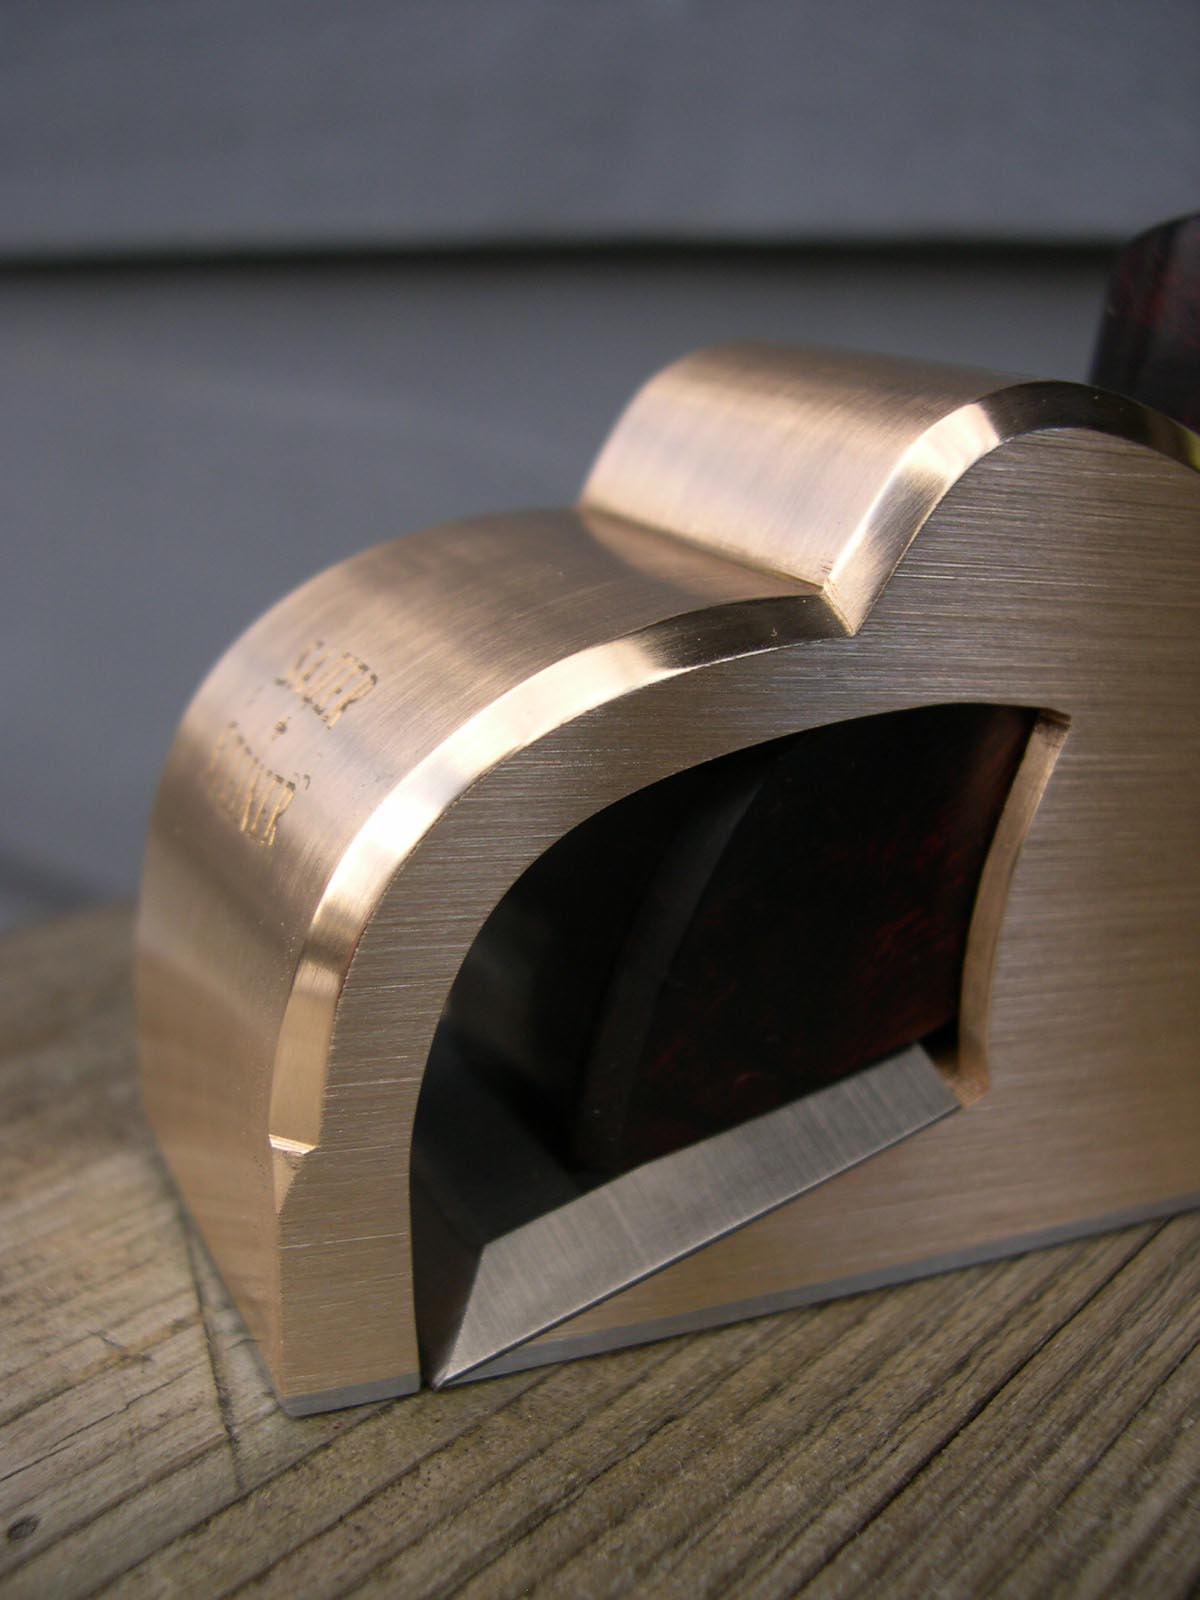
With the sole and sides lapped square, it was time to cut the mouth.

Next was to file the bed. There is a large hollow area in the back of the casting that is typically infilled with some inexpensive secondary wood - often Beech (I would have none of that!)


Once again I was impressed with how well these castings were done. All the casting marks and pitting disappeared as the bed was established. The blade bedded wonderfully and I had a wee bit of filing to do to open up the mouth.
Now for the fun part - the wedge.

The first step was to establish the correct angle. This may sound odd, but I have never had to do this before - I have always made dovetailed planes so knew all the angles. This being a casting, it was hard to measure, so I just cut up a piece of poplar and started fitting it.
My approach to the wedge design was somewhat similar - I just started shaping and stopped frequently to see how it felt in my hand. The 2 photos below are what I ended up with.


I also decided to do the chamfering but was undecided about how to terminate them. I left the ends of the chamfers rather blunt so I could think about how to end them. Chamfering the edges before the wedge was shaped resulted in a happy 'aha' moment. The end of the wedge follows the same trajectory as the middle hump in the plane and it was immediately obvious that the chamfer line should also continue on the tip of the wedge.

Poor me I know - but one of the biggest head scratchers for me when making a prototype (a plane for myself) is deciding on the infill wood to use. After walking around in the shop for what felt like hours, I realized that I did not have a Desert Ironwood filled plane for myself. A customer had reserved all the dark Desert Ironwood burl I had left, but was willing to let me take a wedge out of one of the offcuts.
As I was applying the french polish to the wedge, I started working on the other bullnose planes. These two customers requested lambs tongues for the chamfer terminations. I was really excited about doing these as I knew they would look great - here they are.


I really debated on lambs tongues on my own bullnose - then I remembered the chamfer termination on the Boxwood filled Bayfield and decided to do something similar. Here are several photos of the finished prototype.


While I am quite thrilled with the results of the bullnose plane adventure, I hope I never have to deal with another casting again. Here is the thing - unless you are looking to produce in volume and have access to high quality milling equipment - dovetailing a plane together is faster and way less expensive to get started. And it will be easier all along the way. Now - I should qualify all this by saying I am approaching this from the perspective of someone who as spent all his time learning the ins and outs of dovetailing metal together and someone who does not own a milling machine (or surface grinder). I am certainly biased because my experience is so one sided. But if you do not have a milling machine or surface grinder, the amount of handwork required to clean up a casting is tremendous - way more than I had imagined. And I was starting with exceptional castings. Cleaning up after dovetailing a plane body has been piened is way easier to do - you have all sorts of accurate reference surfaces to index from and there is no pitting, angled sides or wonky anything. This is of course assuming the piening went well, you did not 'miss' with the ball pien hammer and all your dovetails closed properly.
Cleaning up the exterior of a casting is not that bad (until you find a pit) - it is the interior surfaces that are problematic. I was lucky with this type of casting. The rear infill is enclosed on 5 sides and required a fairly small piece of wood. The challenge with castings is that all the inside corners are rounded and the 'flat' surfaces rarely are. What do you use as an indexing point to start fitting the infill? Not the bottom nor the sides - getting well mated surfaces is nearly impossible because of this. The only reference you really have is the single exposed surface - in this case the bed. Contrast this with a dovetailed plane body. The material you are starting with is plate material - consistent in thickness and without voids or pits. If you fixture and pien the shell together well, the sole will remain very flat (out only a few thousandths of an inch), and will be square to the sides without any distortion on the inside corners. You can make a lot of assumptions about infilling the plane based on the shape and level of flatness of the sides and sole - not so with a cast plane body. Yes, there is more time upfront with a dovetailed plane - cutting, filing and fitting all the dovetails, but I think you come out way ahead in the end because you end up with a shell that is ready to be infilled the moment it comes off the piening block or fixture.
Fitting the rear infill on the bullnose was not too bad, but did required a great deal of time and fiddling around. There were a couple of grains of sand missing which resulted in small islands on the bottom of the casting. I had no way of filing these off so I had to drill a small hole in the bottom of the infill to clear them. I cannot imagine trying to do this with a larger casting... or worse yet, one that needed overstuffing... or worst of all - a plane with curved sides.
I don’t mean to be overly negative about working with castings, again, my experience is very biased, but for a first time plane build - working with a raw casting will likely be a serious challenge. And that challenge is in one of the most crucial aspects of plane making - getting properly fit infills into the shell of the plane. If you are able to have the castings partially processed that would be a significant advantage and may be enough to tip the scales closer to balance.
posted by Konrad at
08:03
15 Comments
![]()
15 Comments:
Great stuff. The process is intriguing, and the end result is... Well, typical, for you.
Great work.
Got mine yesterday, was not sure this was a useful design for me, but having it in hand and trying out a few techniques makes me realize it will be quite useful for me.
And I love the curly boxwood!!
RDW
Fine looking work as always.
Did you use O-1 for the base, mild steel or?
Thanks for the post, I've been missing them.
Scott
Hi Konrad, Lovely job and a lot of hard work, the original makers of the casting would have been proud. Seasons best, David.
Thanks JW - glad you like it.
Cheers,
Konrad
Morning Richard,
Glad it arrived safe and sound. And very pleased to hear that you are finding it useful. Curly boxwood does help doesn't it:)
cheers,
Konrad
Hi Scott,
The base is mild steel. 01 may have been heat treated in the process and would have been a bear to cut the mouth. I will try to post updates more regularly.
Cheers,
Konrad
Thanks David. I enjoyed watching your bullnose restoration - very timely. working with a raw casting was way more work than imagined. I am glad to be finishing up the last one now and am looking forward to piening again:)
Cheers,
Konrad
I'm with Richard, never thought of a bullnose as being that useful. Maybe it was the Stanley I was using!!
After filing some toecaps I had cast I can't imagine how much time you have in one of these.
Really liked the part about sweating on the base.That looks fun.
Great job as always Konrad
Cheers Chris
Konrad:
What is the screw for on the back of the plane in the image "JDbullnoseButton"?
Best regards,
Robert
Thanks Chris. To be totally honest - I was not 100% sure about bullnose planes either. I have never used one and have gotten by quite fine. I am looking forward to introducing it to the line-up and seeing how it fits into things.
Attaching the sole was fun. Somewhat frustrating at times, but a great learning experience.
Best wishes,
konrad
Hi Robert,
The screw at the back is a bit of a mystery to be honest. I have spoken with a few people about it. My understanding of it (at this point) is that it was used to hold the rear infill of the plane in place. There were no cross pins used to hold the infill and the infill was not glued in either. I can understand using a screw to hold the infill in place, but I do not really understand why they would make the head of the screw so large. Many people use this screw as a strike button to loosen the wedge when they want to take the blade out. I have heard from a few people that this is not to be done... which makes me wonder why they would have made the head of the screw so large and 'tempting' to use as a strike button? All this to say - I am not quite sure. I put a screw/strike button on the back of my own bullnose plane partly to see how the process went and to use it as a strike button. The customer who’s plane you mentioned wanted one as well. A few people did not want them. Hope my non-answer helps.
Cheers,
Konrad
Hi Konrad,
Seasons greetings, a lovely read and they looked great, if I could get anywhere near what you produce I would be a very happy man.
Keep up the great work
all the best
Jamie
Amazing work.
Awesome build. Looks fantastic.
Post a Comment
Subscribe to Post Comments [Atom]
<< Home