
New plane number 3

“More wood... less metal”
Those were the instructions. And the only instructions. Last December (or there abouts) a good friend of mine called to talk about the design of a plane. He said that he liked the size of and the idea of a panel plane.... but did not really care for it aesthetically. He then threw down the gauntlet and challenged me to re-think it. All of it. With more wood and less metal (and less clunky looking). And that was that - gauntlet thrown!We talked back and forth for the next 6 months and he periodically asked if I had thought about the new panel plane at all. My answer was always the same “no, not yet - but it is bouncing around in the back of my head somewhere”. He always accepted the response and was in no way pushy (for which I am eternally grateful).
I was filing some dovetails when one of those rare light-bulb moments happened. I put down the file and walked over to the chalkboard and drew. The above photo is what came out. I stood back and looked at it and slowly walked back to my filing. I quickly realized I had better just put the file down before I wrecked something.
I ran into the house, grabbed a stack of tracing paper and was immediately thrown back into my pre-computer college days of design school. Papers flew, pencils wore out - and within 24 hours, I had a set of working drawings.

With drawings in hand, I made a mock-up of the shell. I used 3/16" Baltic birch ply for the sole and 1/8" BB ply for the sidewalls. I wish steel bent this easily!

I was quite happy with the shape and form of the mock-up shell - enough to proceed to the real thing. Oh, there were a few decisions that were made instantly - the first being that this plane had to be steel sided. Scratch that - it could only have steel sides. I know that seeing the dovetails is pretty cool... but on this plane - it would ruin it. This plane has speed and visible dovetails would be like adding 9 anchors to it.

The steel shell went together without a hitch so it was time to address the infills.
Once again - I made mock-ups - this time out of Basswood. Good gravy is this stuff easy to work.
The mock-up allowed me to resolve 2 key areas that I left hanging from the working drawings, and showed me one of the biggest challenges of making this plane. How do you hold infill pieces that do not have any flat or parallel surfaces? And what are the reference surfaces if everything is curved?
The two areas I had to resolve were the chamfer across the inside of the front pad, and how much of a radius to put in the compound curve of the rear infill as it transitioned into the sole of the plane.

The shape of the Basswood front pad came out pretty well - close enough that I was comfortable to proceed. The radius of the rear infill designed itself as soon as I added the chamfer to the end of the sole.

Now... what to infill this with....?
The next two photos are a bit of a sidebar, but I thought I would share a very common issue with old Rosewoods. I roughed out a wonderful section for the handle but was not 100% sure what would happen at the top edge of the piece. There was a great bit of curl that I wanted to keep... but there were also a few checks.

I traced the handle outline twice - once in white pencil crayon and again in blue. I cut out the negative space to see where the checks went.

If I had not done this, I would have wasted a handle blank and that is not something I am ever prepared to do. Not only because this is valuable material, but because it is so tremendously wasteful.
It was also around this time that I started waking up at 5:30 in the morning out of sheer excitement. I fought it for the first few days and tried to get back to sleep. No such luck, and I quickly embraced the moment, giggled quietly down the steps, put on a pot of coffee and skipped out to the shop. This plane was turning my entire process upside down - and I was loving it.

Here is a shot of the piened together shell with the chamfers to the tops of the sidewalls.

The rear infill fit to the shell.

The compound curve of the rear infill (notice that the heel of the sole is not yet chamfered).

Here is one example of creative clamping. This particular set-up allowed me to plane the bed flat and true. Long live the Tucker vise!
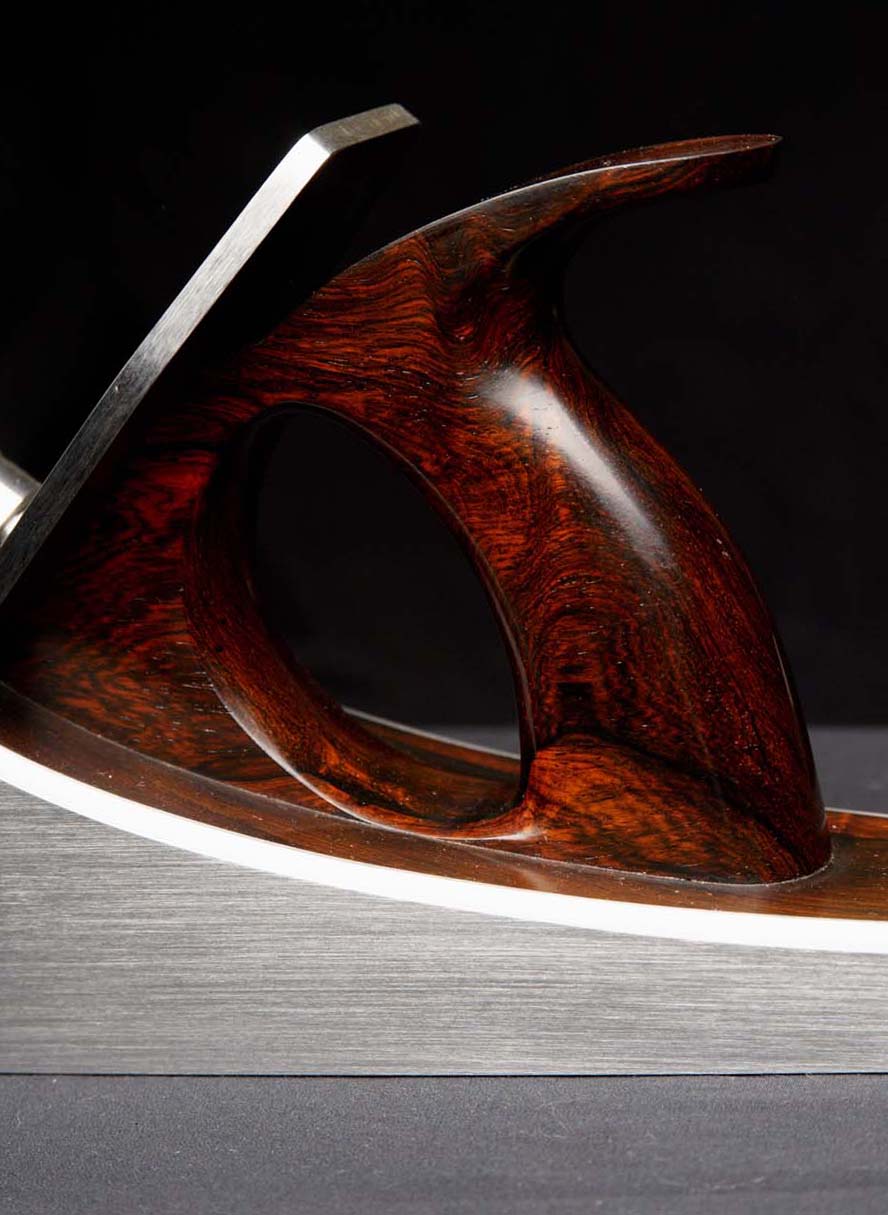
I started having “digestive issues” the day before I was going to shape the front pad. In hindsight, it is kinda strange - I love shaping infill parts... but this one was completely new and I was worried I would screw it up. And... if I screwed it up... I was doubly screwed... the pad was already installed in the plane. So I gave myself some white pencil crayon guide lines and started into it. I went slowly, very slowly - taking the plane out of the vise several times to check the feel of it. Marked the areas that needed more work and those that were done. Two hours later I had this;

This is a very unconventional front grip... but I immediately found it to be very comfortable. One of the many considerations was to make this front grip easier to “pinch” for edge jointing. The pad is much more squat than a typical front bun, and your thumb fits quite nicely on top while your finger tips grip from below.
Even something as simple as french polishing required a new approach. Typically I clamp the infill pieces in a vise and french polish away - easy-peasy. These infill parts could not be safely clamped this way, so I screwed a 3/4" maple block to the bottom just so I could hold them securely in the vise.
One of the most painful aspects to this plane, was the fact that I had to wait for the blade to arrive from Ron before I could actually try it. This was not at all Ron’s fault... it was totally mine. I was not 100% sure on the final length of the blade and held off on ordering it. Truth be told - Ron was very generous in getting the blades to me in record time... my deepest thanks Ron.
During those 3 weeks of waiting - I must have “air-planed” (think air-guitar) my bench 30 times a day. I even made an Aluminum mock-up blade just so I could get a sense of how it would look and feel.
The next 10 photos are my typical balcony photos.


The plane has a radius across the front and is angled forward slightly.


My friend Tracey took these next shots.


(all metal, no wood)
The pair of Bayfield rebate planes and the rebate panel planes (No1R) were also coming to life as I was working on this plane. I know for certain that they each contributed to the others success. It was a rather incredible few months as all this was going on.
The last, and somewhat comical challenge to this plane, was naming it. For lack of a better name, I started calling it the “coffin panel plane” (which is ghastly). This is an unconventional plane, and needed a name that matched. Which was fine by me... I did not want to follow the non-sensical Norris, Spiers or Stanley naming/numbering system (this is the subject of a blog entry all on its own). This new plane will be called the K13. K13 because it is 13 long.
The first outing for the K13 will be Lie-Nielsen’s 30th Anniversary Open House on July 15th and 16th. I am thrilled to be attending this event and visiting with fellow toolmakers and woodworkers. If you are in the area, please stop by and say hello and take the K13 for a spin.
I would like to thank my friend Derrick for tossing the gauntlet in the first place. He clearly knew something that I didn’t, planted the seed, and waited patiently. He continues to show incredible patience as I am just getting started on his Blackwood filled K13.
Hmm... I wonder what a K7 will look like?
posted by Konrad at
08:16
36 Comments
![]()
36 Comments:
Holy Crap,that is stunningly beautiful!
It reminds me of a luxury speedboat,the tapering lines & the transition of the bevel into the front bun is reminiscent of a wave curling away from the bow.
I like the old patterns,the Spiers,the Norris' but they never really struck me as stylish or sexy,this plane does.
Kudos & I look forward to seeing the finest of Dalbergians encased in more hydrodynamic steel...
If you are still building infill planes when I can afford to buy them, I want one of these. Gorgeous work.
Aha, a throwback to the (sane) Millers Falls numbering system! :-)
I love it. She looks beautiful.
Absolutely STUNNING Konrad! The shaping and chamfering give it a grace and life that I've never seen in a plane before. The contrast of the wood and steel is delightful, with the wood softening the potential hardness of the steel. But I think the graceful lines of the sides, the little cusp at the mouth, and the compound curves just echo the best in wooden boat design.
And I can say from experience, it's an absolute joy to handle. Perfect balance, smooth action, and an easy relaxed grip. I'm pretty sure it's the best plane ever.
Congratulations. Wonderful, wonderful work.
Konrad, this plane gives me wood!!!! Truly a masterpiece.
Thanks Black. You are not the first person to see a speedboat in this plane. It is really interesting to hear all the various comparisons. The good news (for me anyway) is all the comparisons are wonderful ones... no one has been reminded of a Lada.
There are already several more K13’s to make - a few with African Blackwood, Desert ironwood burl and Honduran Rosewood burl.
I like the old patterns too but I have to say - they do look a little clunky next to this plane.
Cheers,
Konrad
Thanks tsangell - I hope to be building planes for some time yet. There was a period there where I was not sure... but I have certainly experienced a renewed sense of excitement.
Cheers,
Konrad
Thanks Salty. I had forgotten about Millers Falls...
Cheers,
Konrad
Thank-you for the very kind comments Peter. It was a real pleasure to have you over and get your feedback on how the plane felt in your hands. You can have another go at WIA in the fall.
Thanks too for noticing all the details - it makes all the effort worthwhile.
Cheers,
Konrad
I've been lurking around here for a while and now I have to congratulate you on that plane Konrad - I think you've made an important leap.
I am in the middle of filing up my first (small) coffin smoother. It's been a right palava to hold it - to cut it, to pein it, to do anything with it; how on earth did you hold that?
Wonderful job.
That is by far my favorite plane you have made so far. Great work!
Nice one Konrad, I had just watched a video of the restoration of an old PT boat before seeing this plane. I instantly thought Boat when I saw it. It's the graceful curves. You nailed them. Definitely has that Mid Century Modern thing going. Sweet!!
Thanks Richard.
I am going to guess that you might be "Richard T" on the UK forum - in which case I have been following along with your build.
Holding pieces securely and accurately is a rather monumental challenge (as you now know). It is one of those aspects to planemaking that unless you have tried it - it may be hard to appreciate. In a very sick sort of way though - it is one of the things I love about this - lots of very unique problem solving situations, most of which there is no manual for (but if there is - please let me know:)
Cheers,
Konrad
Thanks Chris.
The boat theme again - I love it!
Curiously - I have always wanted to make a mahogany strip boat of some sort...
Cheers,
Konrad
I started reading this post while having my morning coffee yesterday. I just now looked down and starting typing.
Konrad,
gorgeous design and execution.
Tyler
This plane certainly does look "fast". I love the simplified curves on the sidewall and the way the chamfer carries around the back of the front bun. Your time in design school was well spent.
Konrad, first I would like to thank both you and Derrick for coming up with this fabulous plane. As you know, I have said from the beginning that this plane more than any other is going to change the plane making world. It is simply stunning and now my only issue is where is mine??? :o) Fred
amazing design! It invokes a retro fifties, with a true grounding in the present. Absolutely stunning! Thank you for sharing with us!
Thanks Jameel. I hope you get a chance to try it out next week and give me feedback. See you in Maine!
Cheers,
Konrad
Thanks Tyler.
Cheers,
Konrad
Thanks Kevin.
As I was doing the drawing, one of the ways to keep it "fast" was to imagine it in a wind tunnel. I did everything I could to eliminate drag. It is hard to tell from the photos, but the lever cap is modified to allow air to flow over the shoulders more easily.
cheers,
Konrad
Thanks Fred. Your involvement during this project was much appreciated. Your excitement and enthusiasm certainly added fuel to the fire.
The chunk of Desert Ironwood burl is sitting on my bandsaw right now my friend:)
Cheers,
Konrad
Thanks Carl - you are most welcome. I did have 50's on the brain when I was working on this - 50's cars to be specific. It is really amazing to look at something like this in hindsight and realize all the influences that are rolled into it.
Cheers,
Konrad
Hi Konrad,
Truly wonderful work! I'm looking forward to seeing it in Warren, Maine.
Now, maybe I've missed something. did you explain in the post the answer to:" what are the reference surfaces if everything is curved?"
oh no ! If I'd have known you were looking I'd have swept the shed.
I have followed your blog for some time now. I'll look in from time to time to see what new project you have going on. I have never takin the time to leave a comment until now. This plane is such a work of art. All your work is beautiful, but this is such a brake from the mold. I hope you have some of those picture blown up & for sale on your websuite. I know i'd get a couple.
Ah, that's the one! I got to try this at the LN 30th. Smooth sailing! Of course, all your other planes you had there were just as smooth. They're all gorgeous.
This plane reminded me of Boyd Coddington's '57 Chevy "Chezoom"
http://www.57classicchevy.com/1957-chevrolet-chezoom.html
Thanks for the great blog!
Holy cow! Drinking my cup of coffe this morning I ran into this entry! That is a plane with a design from another star. Just wonderful! Every single line is thoughtful and makes it to look speedy and most elegant. I'm completely hooked with it for sure.
My sincerest compliments on this work of art, Konrad. It's a big challenge to to leave some traditional design presettings in tool making. You did it in an amazingly perfect way. Couldn't be better. This plane is an icon of tool making.
Klaus
Hi Tico,
Great to see you again in Maine. It was great to sit around during breakfast and in the evening as well. What an amazing B&B!
I did not really answer the question of reference surfaces - but I will attempt to once I start making the first few "production" planes (the word production is used very loosely:)
Cheers,
Konrad
Hi Steve,
Glad you had a chance to try it out at the LN open house. And thanks for trying it out. Everyone provided great feedback on using this new plane. The response to the front pad has been very positive - which is great.
Cheers,
Konrad
Hi Rich,
Thanks for the link. That is a super-cool looking Chevy! I can see how it reminds you of the plane.
Cheers,
Konrad
Good morning Klaus,
Thank-you for the very kind comments.
Cheers,
Konrad
any updates? its been a month and a half. big fan of your work!!!
Konrad,
After all these years and all those builders over the decades, it is refeshing to see new ideas and interpretations coming to the fore.
Many of those "refeshing" new looks do not translate well into practical use, your work, on the other hand, definitely balances the desire to look AWESOME with remaining true to the core of the craft - a tool that does the job it is suppossed to do!
Post a Comment
Subscribe to Post Comments [Atom]
<< Home