Sunday 21 November 2010

Release the hounds!


All of my previous benches have had 2 (square) bench dogs - one in the tail vice and one in the main part of the bench. During the Shaker bench restoration, I had been in pretty close contact with Jameel and one of the questions he asked was if I was going to put a dog in each hole. I was really surprised by the question, but after talking about it for a while, he convinced me to have at least several dogs in various spots on the bench.

Because I had only ever had 2 dogs per bench, I always made them individually. In this case, I tried something new. Well... I am not sure if it is new - but it was new to me, and I thought it might be worth sharing a simple way to make a lot of dogs in one swoop.

I started with a few offcuts from the bench build and essentially made two, 4" wide dogs and then ripped individual dogs off that glued up uber-dog. Here is a quick series of photos to show how it went.


The 1/4" shoulder at the top of the dog was cut on the table saw using a cross-cut sled. The “spring” was ripped on the bandsaw. Remember to factor in the 1/8" thickness of the spring when calculating the overall width of the dog. You will end up ripping the spring twice in order to end up with an 1/8" thick spring (it is initially 1/4" with the first cut).

I planed off the bandsaw marks and planed both sides of the spring.


This photo shows how I planed the angle at the bottom of the dog. I used a longer plane and registered the sole of the plane on the top of the dog and planed the end until I had about a 1" area for gluing the spring. The arrow shows where the plane is resting.


A few spring clamps to hold it all together.


Once the glue has dried, plane the edges flat and square and proceed to the bandsaw to rip the individual dogs. Rip the dogs slowly - the spring is quite thin, and if you try to rush it, you could get tear-out on the backside of the spring. I cut them slightly wider than I needed so I could sneak up on the fit with a plane.


Here are the 4 dogs from the first batch. (the 1/2 dog in the middle was waste). A few plane passes on each edge and they were fitting perfectly. If the spring is a little too stiff and the dogs are hard to get in and out, use the same process for creating the angled glue area and remove some of the material where the spring starts to bend. A few passes can make a big difference to how easily the dog fits.

7 Comments:

Blogger David said...

Good work again Konrad!! Do you prefer square dogs over round ones? do you use hold fasts on you bench? if yes, where do you have the round holes for the hold fast??
Thank you
Cheers

22 November 2010 at 01:25  
Blogger Konrad said...

Thanks David.

I do prefer square dog holes. The holes are harder to make, but the dogs are easier. I use holdfasts, but not on this bench... too many drawers underneath.

Cheers,
Konrad

22 November 2010 at 15:52  
Blogger Jameel Abraham said...

Woof! Great idea!

23 November 2010 at 00:39  
Blogger Konrad said...

Arf! Thanks Jameel.

23 November 2010 at 07:22  
Blogger F. said...

Very nice work! Those last three posts have given me the need to build a new bench for my shop...

What glue did you use to laminate the top?

Francis

24 November 2010 at 23:55  
Blogger Konrad said...

Thanks Francis,

If my posts have inspired you enough to start planning and building a new bench - you have made my day. That is the whole point of this blog... to offer inspiration to anyone willing to put up with my blithering.

I used Lee Valley 2002 GF glue.

Cheers,
Konrad

25 November 2010 at 12:56  
Anonymous Chris F said...

Francis, a bench lamination has so much surface area that just about any reasonable glue can be used. The strength isn't the issue, so pick whatever is convenient. I used Titebond III because of the low chalk temperature since I was gluing up in a heated garage in winter.

10 December 2010 at 18:48  

Post a Comment

Subscribe to Post Comments [Atom]

<< Home

Saturday 13 November 2010

shaker bench - the fix


I did not think I would be repairing the shaker bench so soon! As Dan commented, I have made a pretty major structural error. This is one of those sad instances where, in hindsight, you cannot believe you overlooked it. I oriented the half-blind dovetails on the end cap the wrong way. The force from the wagon vise is not at all supported by the dovetails.

What to do.

I spent a good part of that morning thinking about the options. I could put a few lag bolts through the end cap into the main part of the bench. This would be easy to do and would solve the problem. Trouble is - I really did not want to disturb the clean surface of the end cap. Set this idea aside to see if there was another solution. I then thought of adding a steel plate to the underside of the end cap and connecting it to the front apron. Jameel suggested moving one of the wagon vise rails forward so one of the screws also tied into the end cap. Moving the rail and adding a steel plate seemed like a pretty solid solution - so I went for it (and I could still add the lags if this failed).

Unfortunately - the Metal Supermarket had closed early and I was not able to get a piece of 1/4" steel for the plate. You would think that a guy who makes planes would have lots of scrap material on hand... nothing. Then I remembered the spare base plate for a jack post. It was 5/16" thick and had three pre-drilled holes in it. With some careful arranging - I could get the piece I needed and avoid all the holes but one. I was able to position the hole where I needed to make a cutout for the rail anyway. Unfortunately - this meant a lot of extra cutting. About 5 minutes in, elbows burning, I reminded myself that this was my punishment for making such a stupid mistake. It was about 1/2 an hour of hacksawing but the rough shape was done. Thankfully, I am fairly efficient at using a hacksaw and there was minimal filing and clean up to do on the edges.


Here is the plate in position with the wagon vise rail re-located. It took a few minutes to arrange the positions of the screws. There were quite a few other holes in the end cap already and I did not want to turn it into a piece of Swiss cheese. From left to right; the two left most screws catch the front apron only. The next one in catches a solid part of the end cap. The screw in front of the rail catches the solid part of the end cap and the last screw catches the end cap as well as the tenon of the main part of the bench.


I really debated on trying to locate a screw through the 1/2 blind dovetails, but I was worried it would compromise them structurally so I opted to position 2 screws in the solid section above the front apron.


Now that I had the top off (again) - I had an opportunity to take a few photos of the underside of the wagon vise. I was not sure if my explanation of the traveler covering the hardware and providing a “dead zone” above the base leg made sense. In the above photo, you can see the large nut is just proud of the Honduran Rosewood. This was done so the nut would bottom out against the end cap and not the wood. At least I took clamping force into account this time.

You can also see that the dog hole is positioned as far forward as I could get it with the pre-drilled hole in the hardware.


Another view.

Hopefully this will take care of the it. If there is a problem, I will likely know about it rather quickly - this bench will see a lot of use. And while this whole thing has been quite embarrassing - Dan, thanks for catching this. I would rather deal with it now than after something went “pop”.

6 Comments:

Blogger Adrian Baird Ba Than said...

Do'h!
An annoying mistake but at least it's an easy fix,imagine if you had to remove the whole edging to reorient the joint?
I assume to screw that goes through the half blinds is going almost completely through them (-10 to 15mm)?
Beautiful job on the overall refurbishment,I'm sure this boo-boo will serve to remind you to check orientation in the future,(like on a paying job!)
Cheers bud
Black

14 November 2010 at 19:02  
Blogger Konrad said...

Hi Black,

Yes - the screws that hold the plate are just shy of the top of the bench. the top is 4" thick and the screws are 3-1/2" long.

If this were a paying job the decision would be very easy - rip off the front piece and the end caps and do it over again. Because it is my bench, I have the luxury of being able to repair it.

Cheers,
Konrad

15 November 2010 at 08:09  
Anonymous Andy said...

Looks like a solid repair! I just wanted to say thanks for posting this, even though it probably wasn't much fun to bring attention to it... Indeed, we all screw up once in a while. Your post provides an excellent example of a GOOD way to deal with a mistake - with humility and optimism. (Even if that wasn't your initial response?) Thanks again, and have fun with the "new" bench!
Andy

16 November 2010 at 09:41  
Blogger Konrad said...

Hi Andy,

Thanks for this - I really appreciate your note. I too always appreciate when people explain what they did after something went wrong. Those are often the creative solutions that I really learn stuff from. I guess it was my turn. Hopefully others can learn from my mistakes.

Best wishes,
Konrad

16 November 2010 at 23:29  
Anonymous Adam said...

Hi Konrad,

A little bit of an unrelated comment here (although I do love the way the bench turned out, it looks fantastic). I suppose what I am looking for is advice. I am new to woodworking and have been reading your blogs for a couple of months after reading Chritlstopher Schwarz sing your praises in many of his various writings (very well deserved, if you will allow me a little flattery). Anyway, enough of my rambling and to the questions:

1. I am just starting to get into buying handplanes and I only want to get a couple to start with. I was thinking of an LN low angle Jack and a Veritas low angle smoother. I was wondering if you think those two planes would cover a wide range of functions for the time being?

2. Chisels. I want to start off with a really good set so they will last until I die or am too arthritic to use them. I was thinking LNs or blue spruce toolwooks. What are your thoughts on those two brands?

Sorry for the lenght of the question but I don't have anyone I know personally to turn to for advice so I would really value your opinion. Thank you for your time.

Warm wishes
Adam

20 November 2010 at 16:29  
Blogger Konrad said...

Hi Adam - and welcome here.

I can give you a fairly quick answer here, but may I offer to call you to talk in person? It would certainly save our typing fingers:)

First and foremost - learn to sharpen. I cannot stress this enough. Sharpening is the key to all woodworking. Even the highest quality steel will not work if it is dull. So learn to sharpen. And once you think you know how to sharpen - keep learning... there is always more to learn about sharpening.

1. The LN low angle jack and the Veritas low angle smoother will certainly cover a wide range of functions. Before I go in to too much detail about the pros and cons of any planes though, it would be helpful to know how you currently work and what type of work you plan on doing. There are a dizzying number of planes available today (which is a good thing) for any price point and for a wide variety of functions. I started woodworking before low angle bench planes appeared and so my options were greatly reduced - I learned on bevel down planes. I suspect this has left me somewhat biased towards them because I have a higher comfort level with them.

2. On the chisel front my woodworking adventure started before either of these 2 brands were available so I have little personal experience with them. They are both beautifully made and from everyone I have talked to - both are wonderful to use.

Have you had a chance to try either of these brands before? How about either of the bench planes you are considering? It would be very helpful to attend a show where any or all of these brands will be represented and give them all a try. What feels great to someone else may not be what is right for you. I know I was amazed when I had a chance to try a LN No.4 and a LN 4-1/2 back to back. I am totally a No.4 guy... the other felt too big for me. I would have never been able to figure this out without having a chance to try them both.

I hope this helps a bit, and I would be happy to call if you want to talk further. You can email me your phone number;

konrad@sauerandsteiner.com

Cheers,
konrad

23 November 2010 at 18:42  

Post a Comment

Subscribe to Post Comments [Atom]

<< Home

Wednesday 10 November 2010

Shaker bench restoration - the home stretch

(this is where it started - Riley dumping out mouse poop from the drawers)


This bench arrived on July 07 2007. Kinda embarrassing that it has taken over 3 years to restore it. I have posted a bunch of photos of the base restoration here, and a very recent post about restoring the Emmert vise. The biggest, and scariest job was restoring the top. In a strange series of domino events, I found myself needing to finish the bench because I needed a bench this size for an upcoming project. It was time to start.

One of the first considerations was re-locating the Emmert to the right hand corner (where a left handed person would want it), and fit the bench with a BenchCrafted wagon vise (more on this vise later).

The original top was made up of fourteen, 1-1/4" wide, 2-3/4"deep strips of hard maple. The back 13" was a single 1-1/8" thick piece of hard maple. The bench was just over 8' long. The front 4 strips were pretty trashed - I pulled out about 34 nails in the first strip alone. It also had a rather large mortise cut into it for the Emmert, so I decided to replace the front 4 strips with new material. This would allow me to make a thicker top to suit the wagon vise specs as well as mount the Emmert from scratch (not to mention eliminating the risk of missing a nail and damaging a machine or hand tool).

To my surprise, the adhesive used to hold the 14 strips was either so old, or of such poor quality, that I was able to pull them apart. I only “lost” one strip in the process. I did a very careful nail and screw check and then re-dressed all 4 sides of each strip. They were in excellent condition and I only lost about 1/8" of height and width. I also flattened and squared the large single board at the back. All I can say is thank goodness for a 16" jointer!

I glued up the front section into 2 pieces (4 and 5 strips respectively). I then put each glue up through the thickness planer before gluing the two pieces together. This made for an extremely accurate middle section.


Above is a photo of the glued up middle section as well as the 13" wide single board at the back.

I used five pieces of 1-1/4" wide by 4" deep hard maple for the very front of the bench. I treated this front section as a separate piece. It was wide enough that it housed both vises. I decided to waste away as much as I could for each vise before I glued up this front section. It worked out really well and saved myself quite a bit of work.

I cut 24 square dog holes into the second strip to keep it aligned with the wagon vise. There was enough space to the right of the Emmert for a single dog hole... just in case I am ever dressing anything over 8'. It is a lonely dog hole... but I am sure it will be much appreciated when the time comes.


In the above photo, you can see the radius cutout to the left of the dog hole strip. This it to accommodate the wagon vise hardware.

One thing I really debated was if I should flush mount the Emmert or not. I was really on the fence with it. My gut told me not to - it would greatly reduce the ease of using the vise. Thankfully Jameel and Raney jumped in and confirmed to go with my gut.

I did decide to bury the vise as far into the bench as I could before it would restrict the range of movement. This meant that the “L” shaped mounting bracket would be attached to the second strip from the front edge. And this meant that the front strip was going to be cut completely. I did not want to cut the front strip and then try to glue it on after the fact so I came up with another solution.


I used an off-cut that was the same dimension as the front strip and marked out what I thought was the best cut out. Before I started cutting, I attached a strip of maple across the top and put two indexing screws in each end. I then cut out the shape until I had something I was happy with. The photo above shows this template over the hub of the Emmert. The strip connecting the two pieces indexed off the top of the mounting bracket - perfectly representing how it would work when the bracket was flush mounted.


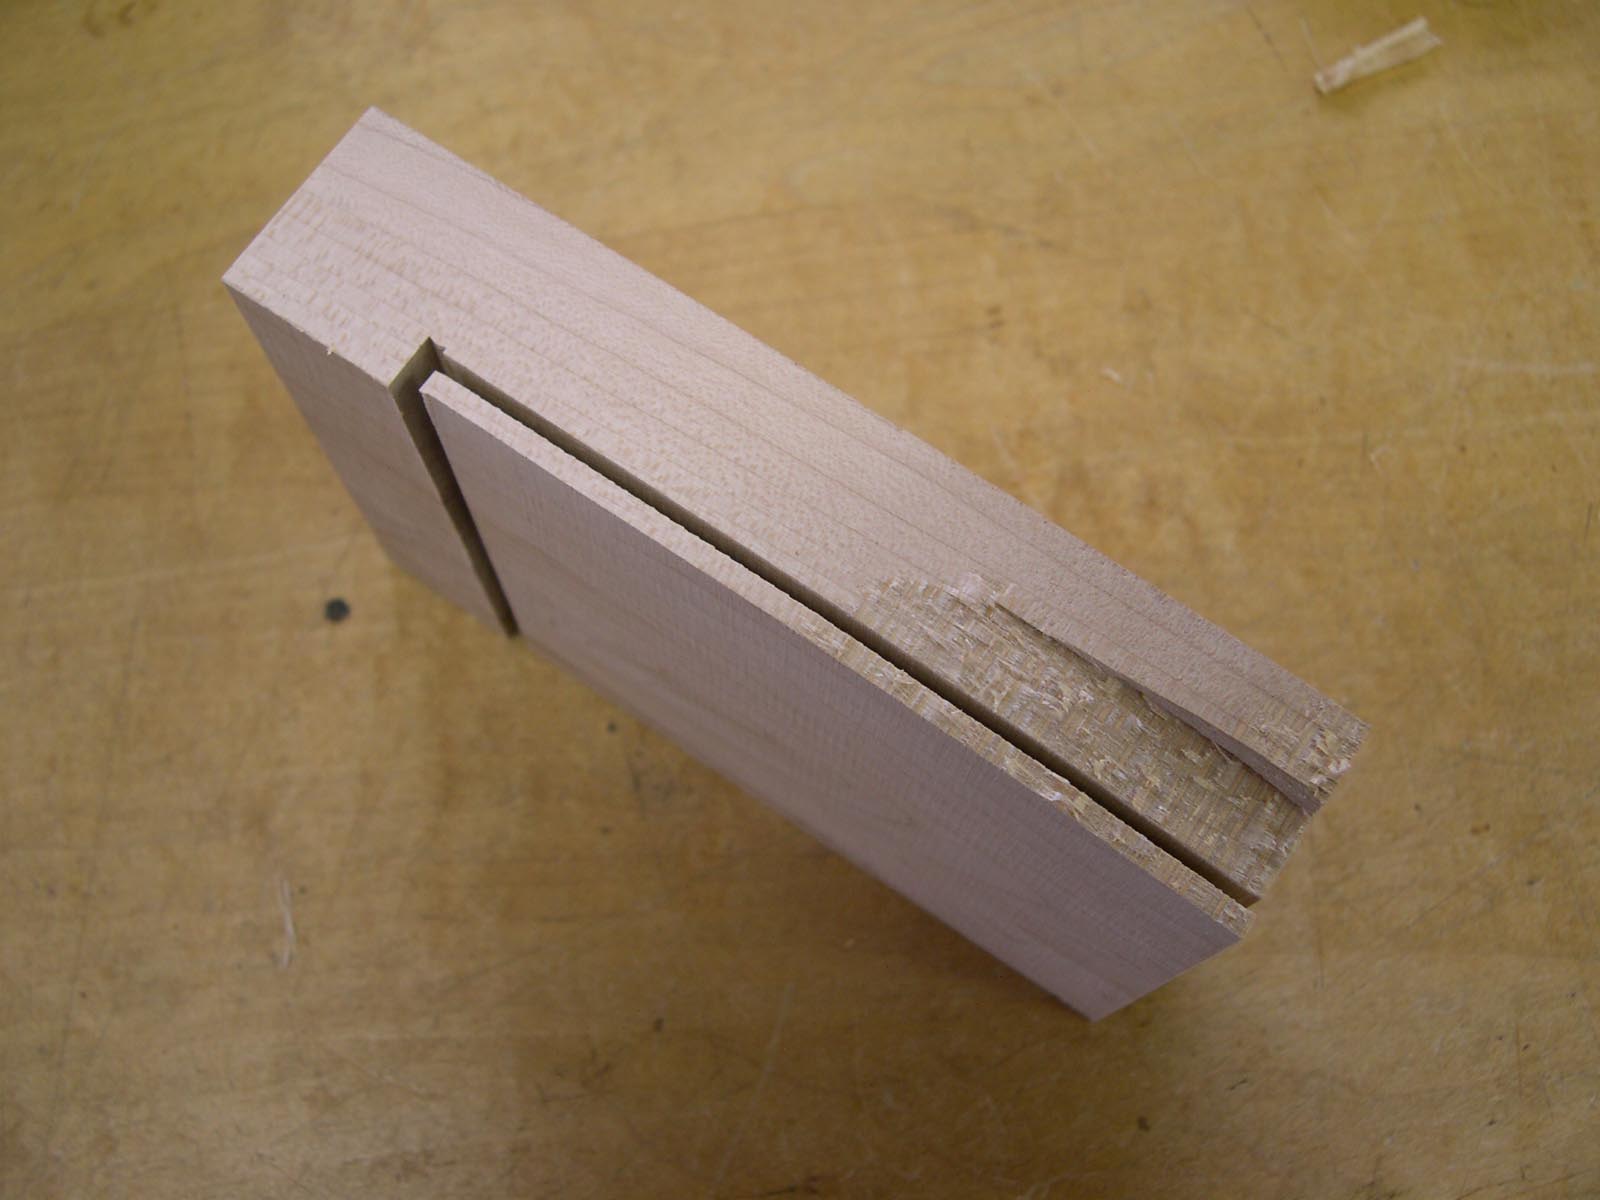
This photo shows the template on top and the actual front strip below (held with the red clamps). I pre-drilled the two holes for the radius’s and then cut a shallow v-shaped groove along the layout lines. This line served a few functions. Firstly, it let me know where to glue and where not to glue. The gap also kept any squeeze out from getting into the area that was to be removed. It worked perfectly!


Here is a photo of the rough mortise for the Emmert.


And a photo of the space for the traveler of the wagon vise.


Here is a photo of the entire bench top - including the end caps. The breadboard end caps are held on by way of a 1" long tenon and a few 1/4" square drawbore pegs. They are also attached to the front of the bench with 1/2 blind dovetails. The 13" plank at the back of the bench is supported by a piece of maple glued into the dado - essentially turning it from an “innie” to an “outie”. The board is held in place with two screws from the underside of the outie.


Here is a photo of the holes for mounting the wagon vise.


The wagon vise installed.


The wagon vise traveler is a block of Honduran Rosewood to match the rosewood knob on the wheel.

There were a few issues with how to fit this new top to the existing base. The original benchtop did not have any dog holes, but I was able to adapt this new feature fairly easily. It was just a question of positioning. The traveler is an L-shaped block of wood and is longer at the back (the end that is closest to the wheel). It covers the metal hardware it is mounted to. This provided the perfect amount of “dead space” to position right over top of leg of the base.


(with the traveler moved forward, you can see the end of the white oak leg)


This photo shows the traveler in the position above the leg and the bench dog just clears it. Phew!! I did have to cut two 5/8" deep, by 7/8" wide channels into the top of the base to allow for the undermounted hardware to clear it. A pretty minor alteration in my opinion (see below photo).


Thankfully, the top drawers are set back far enough to clear the bench dogs and will be out of the way enough to allow for any clamping along the front edge.

My first experience with one of Jameel’s BenchCrafted wagon vises was a few years ago in England of all places. I returned home from that trip and decided I really did need one for this bench restoration (whenever it was going to happen). I had contacted Jameel before the Woodworking in America conference and made arrangements for him to bring a left hand oriented vice for me. Sadly, it sat in its box for over a year.

The hardware was very well machined and very well packaged. I know this is going to sound odd, but I always note how things are packaged. If the person took care with their packaging and packing, it usually suggests to me that they take pride in their work and more often than not, my expectations with the contents are exceeded. This hardware was no exception. Everything moved extremely well, smoothly and without slop. The instructions were very clear and I really appreciated the fact that there were many photos and descriptions of the left handed version. Thanks for that Jameel! Now that the vise is installed I am even more impressed. It works like a dream and I cannot wait to try it out. It has a tremendous capacity in that it has a very long travel distance. I also like the fact that the traveler is 1-3/4" wide which means I can clamp any thing up to 1-3/4" thick vertically.


Here is a photo of the finished mortise for the Emmert. I did not complete it until I had the top planed flat and true - I figured the 5/16" deep area for the top of the bracket would change once the top was flat.


Here are a few photos of the Emmert mounted.


As close to flush as I could get before interferring with the range of motion.


The Emmert in the upright position to show the cutout in the bench.


A close up of the cutout (although the camera chose to focus on some Honduran Rosewood logs in the background. Can’t say I blame it though!)


And the finished bench top. I sent this photo to Jameel and he politely asked if I was going to do anything with the last original “General green” drawer. The question made me smile. I am of two minds. Part of me is tempted to leave it - just because it is so ugly and part of the story of the bench. The other part of me knows it is so ugly. I think I will live with it for a while and see how I feel about it later. Part of me worries that I will end up replacing both drawers with ones that are not falling apart. Maybe this restoration is not really over - just mostly done - at least the hard parts are done (famous last words I know).

12 Comments:

Anonymous Dan said...

Beautiful bench! I for one like the green drawer. I am also a big fan of the benchcrafted wagon vise but didn't you dovetail the end cap in the wrong direction? Won't the force when clamping tend to push the end cap out of the dovetail?

11 November 2010 at 10:39  
Blogger Konrad said...

Hi Dan,

Drat... you are absolutely correct. I will take a look at how everything goes together and see if there is an elegant fix for it. Man - and here I was all excited about it. Just when you think you have thought of all the details a major one like this gets away on you. Argh!

Cheers,
Konrad

11 November 2010 at 11:58  
Anonymous Bob Easton said...

What a fabulous bench! You've made the top look brand new.

I can't imagine the tedium of cleaning up all the drawers. I'm guessing Riley was kept busy.

Beautiful results!

11 November 2010 at 17:14  
Blogger Konrad said...

Thanks Bob. And thanks too for your catch earlier!

Riley was a huge help with cleaning up the drawers. He dumped the mouse contents into a garbage can and even did some scrubbing if I remember correctly (it was 3 years ago after all:)

Cheers,
Konrad

11 November 2010 at 18:01  
Blogger Konrad said...

Dan,

I took a quick look under the hood and I think I have a few options for reinforcing the end cap. I am totally embarrassed by this huge oversight on my part. Anyway - thanks for the catch - it is better that I know about it now and take measures to correct it before I start using it.

cheers,
Konrad

11 November 2010 at 18:02  
Blogger Unknown said...

what a great post !

i'd leave the drawer as ugly as it is-
just makes sense.

11 November 2010 at 20:09  
Blogger Konrad said...

Thanks Tom.

Hmmm... ugly drawer appears to be winning! Interesting.

Cheers,
Konrad

11 November 2010 at 20:17  
Blogger Jameel Abraham said...

Leave it up to you to push the envelope Konrad. I would have expected nothing less from such a perfectionist. The bench looks great and the notched leg around the rails is slick. A great way to eliminate that overhang if you like without sacrificing clamping capacity. The dovetails looks classy and refined, and I like them very much. Positioning the visible side of the joint on the ends is an exercise in restraint that shows its power unexpectedly. A sort of tension-and-release mechanism that is more commonly associated with fine music. As an instrument maker (I'm referring to your fine planes) I'm not surprised you used this device. As for the structural issue posed by Dan, with a little ingenuity this dovetail arrangement can work fine. Congrats on the build, I hope you enjoy it for many years.

11 November 2010 at 23:00  
Blogger JW said...

I went through a similar debate when I installed my own Emmert recently. Ultimately, I decided to mount it 1/8" proud of the front edge: close enough that I could clamp to the front edge of the bench (using a shim) but not dead-flush. 1/8" of clearance for whatever is rotating seems a nice safe distance to me.

Initially, I tried insetting it into the front edge of the bench, and then had to hog out all kinds of material to provide clearance for the rotation. After a while, and a lot of tweaking, I decided enough was enough and just made a large square notch out of the bench top.

14 November 2010 at 22:13  
Blogger Konrad said...

Hi JW,

Nice to hear from you. So in the end, are you happy with the way the Emmert turned out? I have been using mine quite a bit lately, and other than needed to install an overhead light above it - I love it! It really is an amazing vise.

Incidentally - I had to do one bit of minor emergency surgery when I mounted the vise for the first time. I had cut a square notch in the underside for the square threaded rod housing, but did not realize that this rotated. I crawled under the bench and chiseled away. It is not pretty... but it worked.

Cheers,
Konrad

23 November 2010 at 18:48  
Blogger JW said...

Hi Konrad,

Had to dig back to find this one, I was looking through your gallery again the other day, hoping you'd completed the shaker bench section. Hard to believe this was 2 years ago.

7 December 2012 at 10:57  

Post a Comment

Subscribe to Post Comments [Atom]

<< Home