Friday 27 November 2015

Fraternal twins?


A few years ago a friend expressed interest in stopped by to try a few planes. He was pretty taken with the K9, and over the course of the next several months, we talked about a few changes to the specs. What was interesting to me was that he really, really liked the Boxwood. Not so much because of the way it looked - more because of how it felt. Boxwood is one of the few infill woods that I do not french polish. I soak it in double boiled Linseed oil, let it dry, and then give it a coat of paste wax. I like the way it looks, but also the way it feels, and I think he connected with that feeling right away.


There were a few changes he was interested in. The biggest issue was to further reduce the physical weight. He wanted to increase the bed angle to 55 degrees (mine is 50 degrees), and to make the blade a little narrower - 2" wide as opposed to 2-1/8" like my K9.

Narrowing the blade would obviously reduce the weight, but so would increasing the bed angle. It allows the handle to be moved further forward because the blade is more upright. Pushing the blade forward allows for the footprint of the sole to be shortened - something else he was hoping for.

These were not minor changes, so it took some time to re-think and re-draw sidewall profiles and make new jigs and fixtures. I was really curious to see how these changes would affect the feel of the plane.


I have taken several photos so you can see how they differ. I have them placed on a 1/8" wide ‘beam’ to see where their respective balance points are.


The sole footprint of the K9-55 (55 degree bed angle), is 7-15/16" long, while my K9 is 8-3/16". A full 1/4" difference in length. As shown below, the position of the mouth changed, but not by the full 1/4". 


The photos above and below show the difference in handle position, almost the full 1/4" is reflected here.


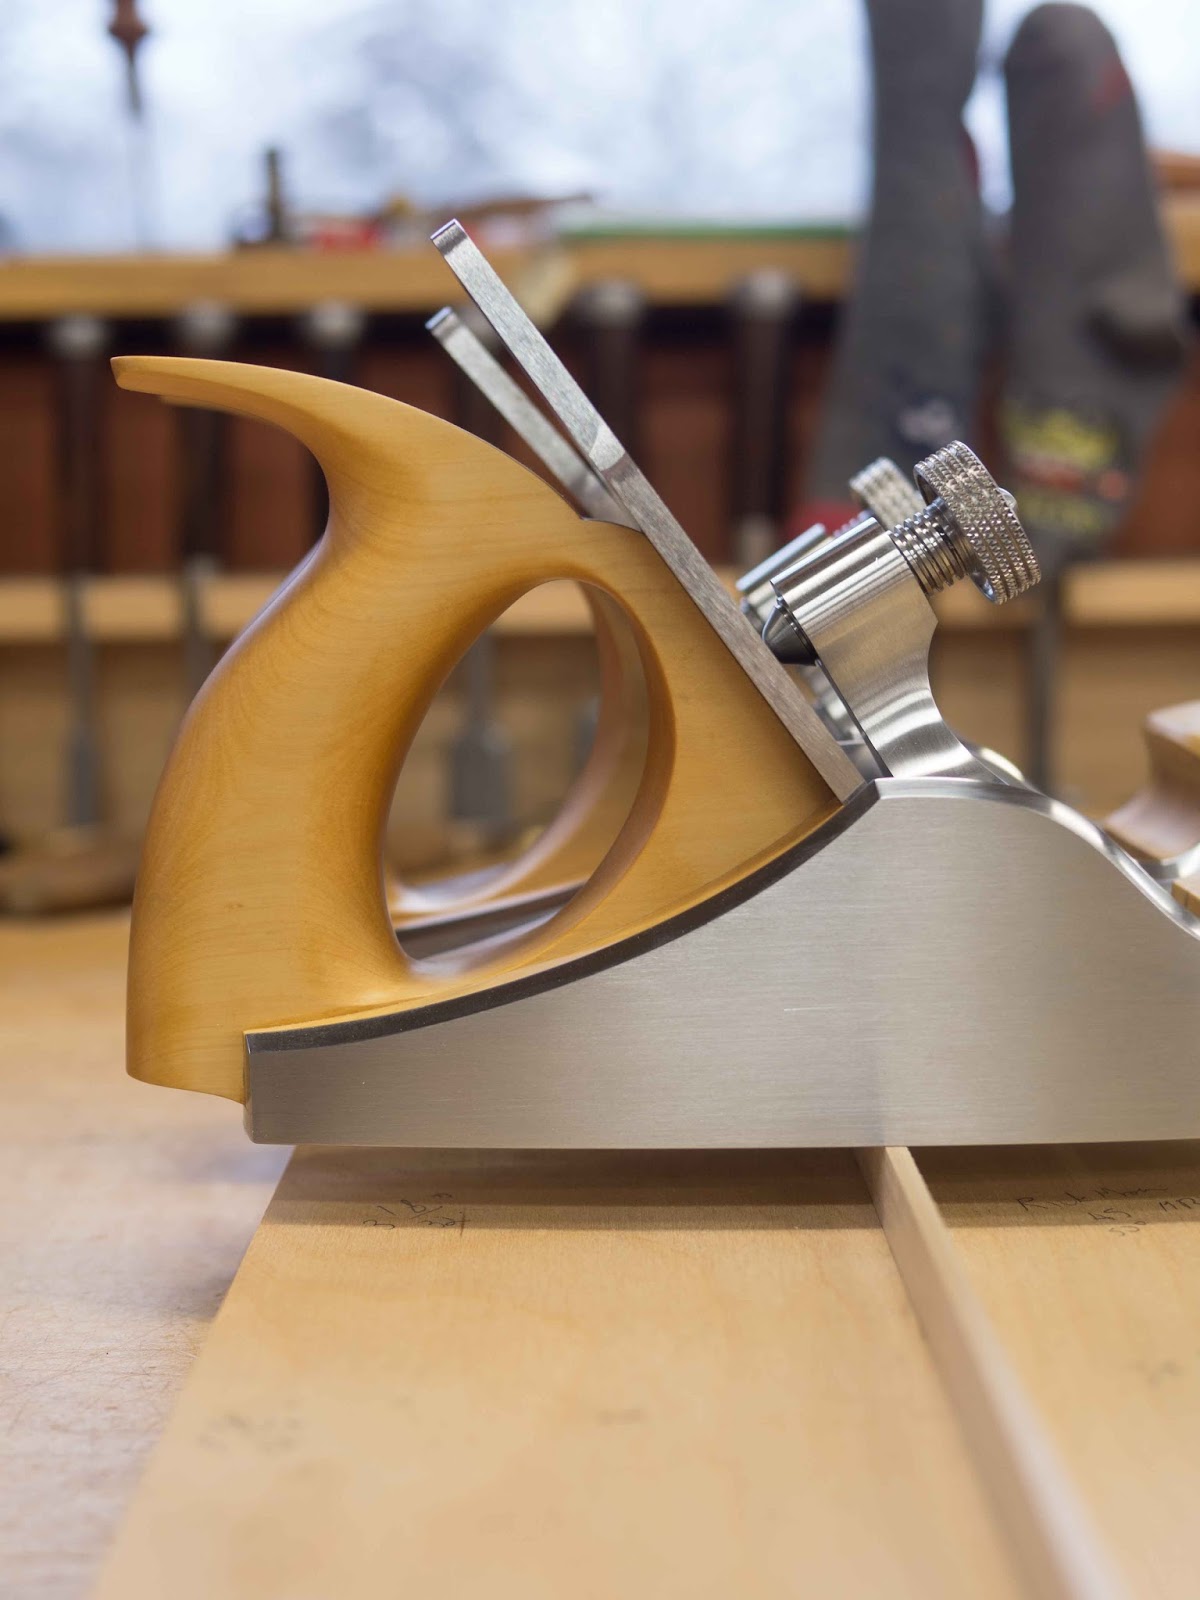
The different bed angles are very obvious.


The front pad is almost the same size on both planes - the K9-55 is less than 1/16" shorter front to back. 


The moment of truth was weighing both planes. I was a little surprised by how different they are. My K9 is 4.28 lbs and the K9-55 is 3.99 lbs - a full quarter pound different.

In use, they feel somewhat similar - the Boxwood handles certainly help, but the reduced length of the K9-55 and the handle being pushed in further makes it feel more compact (which it is). More compact feels a little more nimble, and on the return stroke, it feels like there is less weight in the toe. This is always a good thing - less weight in the toe means less strain on your wrist. This happens because the hand holding the handle is supporting a higher percentage of the planes weight.

There is a trade off with the higher bed angle. The heavier the shaving, the more resistance you will feel. When taking sub 0.001" shavings though, the feeling is pretty minimal, and I suspect sharpness of the blade will be more perceptible than the higher bed angle. The blade will wear faster with the higher bed angle, but if the work you are doing benefits from the higher angle, the trade-off will be worth the additional time at the sharpening station.

I have always preferred a No.4 to a No.4-1/2, and in some cases - even a No.3 size. I like small smoothers. They are more nimble and much easier to use for an extended period of time. These two planes do not represent a massive jump like a 4 to a 4-1/2, but they feel different enough that I am tempted to see if I can justify making myself another K9. Or maybe I will explore the K8 instead.


9 Comments:

Blogger Kevin Brehon said...

Your idea of comparing the two planes using the centre of balance as the reference point is interesting. Does the balance point change much for larger/smaller planes or does it stay consistent with the handle and cutting edge?

28 November 2015 at 10:00  
Blogger Konrad said...

Hi Kevin,

Good question. The longer the plane, the harder it is to control or change the balance point. But there are ways to do it - curved sided planes allow for the front to taper and reduce weight. Having the handle as close to the cutting action as possible also helps. Pick up an longer bench plane and see if it feels like it is hanging heavy in the toe. Some planes are more balanced than others - it is a fun experiment.

cheers,
konrad

30 November 2015 at 13:49  
Blogger John said...

I suppose it would also be interesting to see the center of balance with the planes on their sides rotated 90 degrees. this would tell you whether there is any difference in the height of the weight. if most or all of the weight savings was down low towards the sole, then wouldn't that be a mitigating factor? this question comes more from my sailing background than experience with planes. with a boat, you want the weight as low as possible for a smooth ride. i imagine that would also be true of a plane.

8 December 2015 at 22:57  
Blogger Chris Bame said...

Hi Konrad,
Nice plane. Really like the boxwood look myself and never thought about the feel. I'm with you on the 4 VS. 4 1/2 thing and my 3 was my go to until I purchased your K7!! Interesting question from John also, I share his same passion for sailing and get the idea is thinking about.

9 December 2015 at 12:20  
Blogger Konrad said...

Great question John. If I still had the plane, I would surely test this. I suspect they had similar balance points on the side, but who knows. What would be really interesting would be to compare my 50 degree bed angle K9 with my 50 degree bed angle A5. I will conduct this one in the next little while and post the results.

cheers,
konrad

13 December 2015 at 13:48  
Blogger Konrad said...

Hi Chris,

how do you find the unhandled K7 compared with the handled No.3? Very different planes in use, but I wonder how the lack of handle feels. Did it take a while to get used to?

cheers,
konrad

13 December 2015 at 13:49  
Anonymous Anonymous said...

Hi Konrad,

please keep the drawings for this one. Off all your beautiful planes this would be the one I'd like. Box goes so well with stainless stell and the curves are just perfect!

The smoother I loke the most is a ulmia 44mm.

Cheers
Pedder

18 December 2015 at 06:19  
Blogger Konrad said...

Thanks Pedder,

The drawings, jigs and fixtures are all saved - don't worry! Making a revision to an existing plane is always a fun exercise and a great opportunity to see what happens with changes to the design.

cheers,
konrad

18 December 2015 at 06:48  
Blogger John said...

Hey Pedder,

Still waiting for my saw! Don't forget your customers on the other side of the Atlantic.

John Koten

22 December 2015 at 23:36  

Post a Comment

Subscribe to Post Comments [Atom]

<< Home

Wednesday 11 November 2015

Another flooring adventure


When I was in my late teens, I found myself standing in the Hall of Mirrors in the Palace of Versailles. On some unconscious level, I must have noticed the floor, because 20 years later, our neighbours mentioned the Versailles pattern parquetry floor and I knew exactly what they were talking about.

When we were renovating our living room and dining room, one flooring option we were considering was the Versailles pattern. The other option was a herringbone. I like a challenge as much as the next guy, but the Versailles pattern scared me just a little too much, so we opted for the much simpler herringbone. In hindsight - it was the right choice, but I knew that I wanted to explore the Versailles pattern at some later date. So I put it on the woodworking bucket list and waited.

About 6 months ago, my good friend Wayne called and told me about an Ontario Wood Council RFP to come up with a use for all the Ash lumber being generated due to the clear cutting of all the Ash trees. He mentioned flooring, and I agreed that strip flooring would be a good use for sure, but if you really wanted to have some fun, why not try the Versailles pattern parquetry panels? There was a long pause on the phone, and then we started talking about it more seriously. Within a few minutes we were both pretty excited about the idea and were plotting how to do it.

I was also wishing I had another room in the house that would be appropriate for a parquetry floor!

Our neighbours had sent me a link to a French company that still made traditional flooring (including parquetry). It was a fantastic resource, and by using some of their drawings and dimensions, I was able to generate some technical drawings in Adobe Illustrator.


I color coded each unique piece to help keep track of things. I printed out 2 full scale drawings - one to cut up and make templates and the other to keep as a road map.


We decided to use Ash for the test panel, but we both knew at a very early stage that the only way to really do this was with quarter sawn White Oak (even though flat sawn is what was traditionally used).

We also decided that we were going to do this as though we had to make 30+ of these panels. That meant processing the lumber in one shot, optimizing lengths and widths for maximum efficiency and minimal waste, and dedicated jigs and fixtures that could be used repeatedly. It was an ambitious approach, but we were curious to see if it could be done. We were also hoping that if we could pull it off, that we might find an opportunity to make one of these floors for a customer at some point.

We were going to use live tenons, no adhesives in the joints and use pegs to secure everything. That was the plan anyway.

The shouldered tenon for the 45 degree angled pieces was particularly tricky... until we figured out what a dedicated jig would look like. Hindsight is always so clear. 


There were more similarities between this project and plane making than I would have thought. Process, process, process. And tolerances that are closer to plane making than furniture making. We allowed ourselves 0.002" of wiggle room with our measurements - we were using calipers and not rulers to measure. There are 43 pieces to each panel, and while 0.002" does not seem like much, amortized over 43 piece, its can add up to a significant error. Or in this case, gaps.

We did a lot of test cuts, test fits, etc., before we actually started cutting real parts. The first Ash panel went together incredibly well. One thing we underestimated though was the “squish factor” of Ash.  


(the first Ash panel parts)


With the success of the Ash panel, we decided to move to the White Oak. We decided that we would mill material for 3 panels and make all 3 at the same time - production style. I also made a few adjustments to the technical drawings.


 You can see the paper templates sitting on the stacks of parts.


Assembling the Oak pieces. 


Assembly took longer than either of us would have guessed - and it was also trickier. I am sure there are efficient processes of doing it, but we did not find them. I think that would come with putting a dozen or so together.


One aspect to assembly we did not appreciate, was we needed wiggle room well beyond 0.002" in a few places. The outside frame pieces to be specific. We used the traditional frame where each of the 4 pieces are identical - not like a frame with ‘rails and stiles’. When we were assembling the first panel we realized that we needed to add more slop to the frame tenons in order to actually put the outer frame together. We had to remove at least 1/4" off our perfectly measured tenons.

The panels were amazingly solid once they were assembled - even without pegs. I suspect you could install these panels without the pegs or adhesive and everything would be fine.


(Wayne pondering the next move)

We decided to chamfer the edges of the floating panels. These will likely experience the most wood movement and the chamfers will help hide the movement and reduce the chances of unevenness (and slivers). 


We used 1/4" White Oak dowels for the pegs and hand cut them to length. They are about .030" shorter than the thickness of the panel and are hammered in flush with the top. They are not drawbore pegs either... that would be overkill and not at all necessary given how solid the panels were without them.


We used Rubio MonoCoat for finishing.


All in all, this was a great project and a great opportunity to work with a good friend. We both loved the challenge of coming up with a process that would be efficient but also incredibly accurate and repeatable. I wish we had another living room or dining room to renovate... I wonder if these would be appropriate for our attic?

9 Comments:

Blogger nbreidinger said...

Beautiful! I know there was a pragmatic motive for adding the chamfer but they add a beautiful aesthetic. Don't you just love when a plan comes together?

I like where your head is at, but I think your attic might be too wide a variety climate-wise through the year.'

13 November 2015 at 13:18  
Blogger nielscosman said...

Nice Work!
Also, you are nuts!

14 November 2015 at 11:23  
Blogger John said...

Great project. Kind of a shame anyone is going to walk on that flooring. I'd be tempted to hang it on a wall.

14 November 2015 at 12:41  
Blogger J Alvis said...

Thanks for sharing. I enjoy your side project posts the most.

14 November 2015 at 22:57  
Blogger John said...

i came here expecting to read about skis. must be in the wrong place.

15 November 2015 at 23:02  
Blogger pmelchman said...

STUNNING...

17 November 2015 at 16:47  
Blogger pmelchman said...

STUNNING!!!! GREAT JOB

17 November 2015 at 16:48  
Blogger Konrad said...

I appreciate your concern, but our attic is as consistent as the rest of our house climate wise. The issue for me is using something so decadent in an attic:)

18 November 2015 at 07:44  
Blogger Konrad said...

There will be a wall version John - don't worry.

And you are at the right place for the skis... there is just a significant time delay.

cheers,
konrad

18 November 2015 at 07:45  

Post a Comment

Subscribe to Post Comments [Atom]

<< Home