
Dining chairs - orc mischief
The thing about all this is - you need secret weapons.
Secret weapons are often spouses, significant others or close friends. They are the people who know us really well and can return us to our place when we need ‘correcting’. The world of woodworking (and planemaking) is no different. I have several secret weapon in each - some of whom are so good they can shift from one field to the other. There have been several such secret weapons throughout this dining room chair project - all of whom have contributed greatly. The most recent contributor is my good friend Pat Megowan. Pat has an amazing set of eyes for seeing both overall form and fine details. And he is not afraid to ask tough questions or point out inconsistencies or downright awful design. His input over the years has been tremendous and greatly appreciated.
The crest rail (the back rest) was the last area to be shaped on the dining chairs - and it was left until the end for a reason. It represented the most significant evolutionary change from the first completed chair. The first chair has an aspect that needed to be changed. It has to do with bad posture. After a meal, people tend to sit around a while longer and talk, have a coffee and visit. Most people - myself included, often start slouching in their chair. In the first chair, this was not as comfortable as it should have been. The pommel of the chair transitioned too far back so when you slouched down - you could feel the beginning of the pommel in your tail bone. While this was happening - the crisp edge at the top of the crest rail was becoming more and more uncomfortable. In the end - the first chair requires very good posture. I (we) decided, the last 5 chairs had to be changed to allow for slouching.
Reducing the pommel was the no-brainer - easy-peasey.
I also decided to give the crest rail a bit more of a curve (side to side) so it would hug your back more. The crest rail on the first chair was too flat. This was also easy to do - I marked the center of the crest rail and made a mark 1/4" in from the edge. I then drew an arc to connect this to the outside corners. The only tricky part was to make sure it did not interfere with the Domino holes cut into the ends. There was quite a bit of extra room, so I was not worried about it. A quick trip to the bandsaw and the crest rail had a new curve. All that remained was the top of the crest rail. This one gave me a fair amount of stomach acid, so I decided to leave it until the end and see if a solution would present itself.
Over the course of the summer, I have been picking away at the chairs, all the while staring at the top edge of the crest rail. At one point, I took the mock-up apart and did a bit of shaping. It did not speak to me. Last week I was working on two K7’s and found myself with a possible window of time to address the crest rail. I went to bed Thursday night feeling confident in my plan for the crest rail. I was going to introduce gentle curve to the top edge of the crest rail. The curve would be most noticeable in the middle and taper up to the corners of tops of the legs - in the shape of a smile essentially. I had to be really careful not to expose the Dominos at the top of the crest rail. I did not do any shaping to the back of the crest rail to give myself as much trial room as possible. I figured I would make some layout lines and just start into it and adjust accordingly. Yup - that was the plan Thursday night.
I woke Friday morning with a sense of terror. At this late stage of the project did I really want to risk it all on a hunch? I went out to the shop on Friday morning and made some layout lines. It looked right. It looked like it would work.
So I swept the floor.
Put away a few packing boxes.
Cleaned up the metal filings around the planemaking bench.
Stacked some firewood.
Refilled the water cooler.
Time to call a secret weapon. I sent Pat an email at about 8 am my time - there is a 3 hour time delay. At lunch the floors were clean and everything was tidy. So I called. Thankfully - he was home. And willing to help out.
I explained the situation and my approach and rationale. what I was looking for was either “ you are totally out of your mind dude!” or, “That makes sense”. I would have accepted either - I just wanted to get his gut reaction. We talked at great length about the pros and cons of this approach and the technical aspects of doing it. At one point, he made a comment something to the effect of “... well, when you are shaping the orc horns, how do you...”. I burst out laughing. See, Pat had commented on the initial chair mock-up as something that looked like it came from the Lord of the Rings (Mordor to be specific). We had a good chuckle about it then, but this comment was so fluid and natural and perfectly timed. We had a great laugh over it and then got back to business. In the end - he thought my approach was sound and while it was seriously risky - neither of us could figure out another way of doing it. I was quite relieved to hear that I was not totally out to lunch and hung up the phone with a new found confidence. There was also a sick-little-monkey part of me that was thrilled by the possibility that it could all go down the toilet. The woodworking equivalent of bungee jumping off the Millau Viaduct I suppose.
Ok - on with the photos.

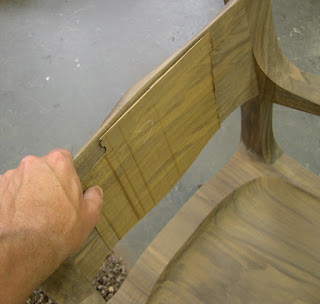
The first step was to bring the top 2-1/2" inches of the back legs flush with the crest rail. There are 2 white pencil crayon marks showing where 2-1/2" is. There is also a white mark in the center. This is 4" up from the bottom of the crest rail and is the point where the rounding begins.

With the tops of the legs flush with the crest rail I drew in a rough line showing the arc of the area that I was going to work. I also marked the top edge of the crest rail - you can see it below.

Nothing complicated about this technique - I use my finger as a fence and drew a line 1/4" from the edge. The shape of the crest rail is thicker in the middle, so this ‘finger as fence’ technique resulted in a very pleasing curve. You can see it below.


Actually - before shaping the radius on the inside of the crest rail - I used a rasp to bring the top corners of the legs in line with the top of the crest rail. I did not want the rasp to touch the back of the leg - just the front edge.

Here is a close-up shot of the top of the leg - the change in texture shows where the rasp was used.

The photo above shows the area that was shaped. It is difficult to photograph - maybe the photo below does a better job of showing it.

The more polished area picks up the light a bit better and shows the gentle curve to the top of the crest rail. You can see a bit of the smile shape.

Here is a top view of the crest rail with the inside edge rounded over. I used a white pencil crayon to trace to top edges of the crest and legs so I would know if my shaping was getting too close to the edges.
Time to shape the orc horns. And I have to say - every time I had to shape one, I was smiling.

The first step is to start with a half round rasp in the middle of the radius at the top of the leg. I point the rasp to the far corner...

... and shape until it is just about touching.

The next step is to remove the small area that is not yet flush with the top of the crest rail. The photo above shows it removed. The reason for this is to allow the tip of the orc horn to be higher than the top of the crest rail.

Like this. It is a really small detail - but one that I really like and figured was worth the extra effort.

Keep shaping until the entire top of the leg has been shaped other than the outside edge. I also start blending it into the back of the crest rail - being mindful of the fact there is a Domino in there.

Both horns are now done. The space between them is cleaned up with spokeshaves.

The photo above shows the spokeshave work. You can see how far down it went by the change in texture.

The back is further refined with rasps and then files until it is ready for sanding.

Here is a shot showing the top edge. It is not as simple as a roundover, but rather a gradual flow of thick and thin areas. There is still a ‘crispish line’ at the top edge - but now your back does not come in contact with it.
The next 3 photos show the amount of curve to the inside of the crest rail.


These 2 photos show the off-cut from the inside of the crest rail. It does not look like much, but it made a significant difference to the comfort of the chair.

This last shot also shows how much material was removed to round over the top.

All 5 ready for sanding.


As I was taking all these photos - I kept placing the camera back on the first chair on the bench. I guess I accidentally took a shot before or after reaching for it. A happy accident.
Secret weapons are often spouses, significant others or close friends. They are the people who know us really well and can return us to our place when we need ‘correcting’. The world of woodworking (and planemaking) is no different. I have several secret weapon in each - some of whom are so good they can shift from one field to the other. There have been several such secret weapons throughout this dining room chair project - all of whom have contributed greatly. The most recent contributor is my good friend Pat Megowan. Pat has an amazing set of eyes for seeing both overall form and fine details. And he is not afraid to ask tough questions or point out inconsistencies or downright awful design. His input over the years has been tremendous and greatly appreciated.
The crest rail (the back rest) was the last area to be shaped on the dining chairs - and it was left until the end for a reason. It represented the most significant evolutionary change from the first completed chair. The first chair has an aspect that needed to be changed. It has to do with bad posture. After a meal, people tend to sit around a while longer and talk, have a coffee and visit. Most people - myself included, often start slouching in their chair. In the first chair, this was not as comfortable as it should have been. The pommel of the chair transitioned too far back so when you slouched down - you could feel the beginning of the pommel in your tail bone. While this was happening - the crisp edge at the top of the crest rail was becoming more and more uncomfortable. In the end - the first chair requires very good posture. I (we) decided, the last 5 chairs had to be changed to allow for slouching.
Reducing the pommel was the no-brainer - easy-peasey.
I also decided to give the crest rail a bit more of a curve (side to side) so it would hug your back more. The crest rail on the first chair was too flat. This was also easy to do - I marked the center of the crest rail and made a mark 1/4" in from the edge. I then drew an arc to connect this to the outside corners. The only tricky part was to make sure it did not interfere with the Domino holes cut into the ends. There was quite a bit of extra room, so I was not worried about it. A quick trip to the bandsaw and the crest rail had a new curve. All that remained was the top of the crest rail. This one gave me a fair amount of stomach acid, so I decided to leave it until the end and see if a solution would present itself.
Over the course of the summer, I have been picking away at the chairs, all the while staring at the top edge of the crest rail. At one point, I took the mock-up apart and did a bit of shaping. It did not speak to me. Last week I was working on two K7’s and found myself with a possible window of time to address the crest rail. I went to bed Thursday night feeling confident in my plan for the crest rail. I was going to introduce gentle curve to the top edge of the crest rail. The curve would be most noticeable in the middle and taper up to the corners of tops of the legs - in the shape of a smile essentially. I had to be really careful not to expose the Dominos at the top of the crest rail. I did not do any shaping to the back of the crest rail to give myself as much trial room as possible. I figured I would make some layout lines and just start into it and adjust accordingly. Yup - that was the plan Thursday night.
I woke Friday morning with a sense of terror. At this late stage of the project did I really want to risk it all on a hunch? I went out to the shop on Friday morning and made some layout lines. It looked right. It looked like it would work.
So I swept the floor.
Put away a few packing boxes.
Cleaned up the metal filings around the planemaking bench.
Stacked some firewood.
Refilled the water cooler.
Time to call a secret weapon. I sent Pat an email at about 8 am my time - there is a 3 hour time delay. At lunch the floors were clean and everything was tidy. So I called. Thankfully - he was home. And willing to help out.
I explained the situation and my approach and rationale. what I was looking for was either “ you are totally out of your mind dude!” or, “That makes sense”. I would have accepted either - I just wanted to get his gut reaction. We talked at great length about the pros and cons of this approach and the technical aspects of doing it. At one point, he made a comment something to the effect of “... well, when you are shaping the orc horns, how do you...”. I burst out laughing. See, Pat had commented on the initial chair mock-up as something that looked like it came from the Lord of the Rings (Mordor to be specific). We had a good chuckle about it then, but this comment was so fluid and natural and perfectly timed. We had a great laugh over it and then got back to business. In the end - he thought my approach was sound and while it was seriously risky - neither of us could figure out another way of doing it. I was quite relieved to hear that I was not totally out to lunch and hung up the phone with a new found confidence. There was also a sick-little-monkey part of me that was thrilled by the possibility that it could all go down the toilet. The woodworking equivalent of bungee jumping off the Millau Viaduct I suppose.
Ok - on with the photos.

The first step was to bring the top 2-1/2" inches of the back legs flush with the crest rail. There are 2 white pencil crayon marks showing where 2-1/2" is. There is also a white mark in the center. This is 4" up from the bottom of the crest rail and is the point where the rounding begins.

With the tops of the legs flush with the crest rail I drew in a rough line showing the arc of the area that I was going to work. I also marked the top edge of the crest rail - you can see it below.

Nothing complicated about this technique - I use my finger as a fence and drew a line 1/4" from the edge. The shape of the crest rail is thicker in the middle, so this ‘finger as fence’ technique resulted in a very pleasing curve. You can see it below.


Actually - before shaping the radius on the inside of the crest rail - I used a rasp to bring the top corners of the legs in line with the top of the crest rail. I did not want the rasp to touch the back of the leg - just the front edge.

Here is a close-up shot of the top of the leg - the change in texture shows where the rasp was used.

The photo above shows the area that was shaped. It is difficult to photograph - maybe the photo below does a better job of showing it.

The more polished area picks up the light a bit better and shows the gentle curve to the top of the crest rail. You can see a bit of the smile shape.

Here is a top view of the crest rail with the inside edge rounded over. I used a white pencil crayon to trace to top edges of the crest and legs so I would know if my shaping was getting too close to the edges.
Time to shape the orc horns. And I have to say - every time I had to shape one, I was smiling.

The first step is to start with a half round rasp in the middle of the radius at the top of the leg. I point the rasp to the far corner...

... and shape until it is just about touching.

The next step is to remove the small area that is not yet flush with the top of the crest rail. The photo above shows it removed. The reason for this is to allow the tip of the orc horn to be higher than the top of the crest rail.

Like this. It is a really small detail - but one that I really like and figured was worth the extra effort.

Keep shaping until the entire top of the leg has been shaped other than the outside edge. I also start blending it into the back of the crest rail - being mindful of the fact there is a Domino in there.

Both horns are now done. The space between them is cleaned up with spokeshaves.

The photo above shows the spokeshave work. You can see how far down it went by the change in texture.

The back is further refined with rasps and then files until it is ready for sanding.

Here is a shot showing the top edge. It is not as simple as a roundover, but rather a gradual flow of thick and thin areas. There is still a ‘crispish line’ at the top edge - but now your back does not come in contact with it.
The next 3 photos show the amount of curve to the inside of the crest rail.

(from the middle)

(just before the leg)

(and at the end)

These 2 photos show the off-cut from the inside of the crest rail. It does not look like much, but it made a significant difference to the comfort of the chair.


All 5 ready for sanding.


As I was taking all these photos - I kept placing the camera back on the first chair on the bench. I guess I accidentally took a shot before or after reaching for it. A happy accident.
posted by Konrad at
22:31
8 Comments
![]()
8 Comments:
Only 30 hours of sanding left and you will have a new set of chairs, nice insight into creative process Konrad.
Only 30 hours of sanding left and you will have a new set of chairs, nice insight into creative process Konrad.
Thanks Richard,
I hope I can get the sanding done in 30 hours. I suspect it may be a bit longer for me. I have 2 of the chairs sanded with the first grit. The first sanding is always the tough one - at least that is what I keep telling myself:)
Cheers,
Konrad
Konrad,
Thanks for sharing your assessment and modifications of the chairs. Critical aspects, in many builds. Seeing your work, and Pat's, has at least tempered the possibility of making chairs in the future. If I could ever finish my dang Les Paul build. ;)
Cheers,
Lee Laird
Konrad,
Thanks for sharing your assessment and modification, relating to your chairs. Having never attempted chairs, it's great to ultimately, be a fly on your wall. Seeing your work, and Pat's, I might consider a chair build in the future. That is, if I can ever finish my dang Les Paul build! ;)
Cheers,
Lee Laird
Konrad,
Revisiting your dining chair series in preparation for some bar stools in this vein and I have 3 hopefully simple questions
I can't seem to figure out how the back rest piece is sized given the odd angles. Is this a case of you just have to fiddle with it 'til it fits, then shape, or is there an easier way that I've missed?
I'm envisioning this set with a charred oak wax finish. Does this Maloof style supports disassembly after shaping to charr prior to final glue-up? I'm worried the heat will fail the glue joints.
One more. Is a set of 6 of these enough to justify a Domino purchase?
Hi Jeremy,
Fitting the crest rail, or back rest, was a little tricky, and a series of odd angles. I made a test crest rail and then fit it to each of the chairs. I did not do any hand fitting with these though, and that one test piece fit all the chairs. There was a difference between the first chair and then the 5 made later though. I think I posted photos of the clamping jigs I made. These were really critical to get even pressure across the screwy angles.
Are you using screws or dowels for your project? If you are using screws, you should have no problem taking it apart and then putting it back together. You could also do this if you were using dowels, just don't use the dowels until the final glue-up. I would not use any heat with the glue - good call.
You can always justify a domino purchase:)
cheers,
konrad
Thanks, good to know that the crest rail was consistent. I will go back and look more carefully at your clamping pictures.
I plan on using screws most probably with some floating dowels/dominoes where needed so the screws won't take any shear loading.
I'm pretty nervous about making my first chair pass through the fire, but the color and texture is really something. I figure I'll follow your lead and keep 1 ahead of the others, so if that process doesn't work out as expected, then I can adjust.
Thanks for the help and I really appreciate the detail you include in the build like for instance the details of how the flat crest rail interacts with your back, knowing what to look at/for is way more helpful than measured drawings.
Post a Comment
Subscribe to Post Comments [Atom]
<< Home