
Dining chairs - shaping the arms

The photos in this entry are about a month old - so I will try to catch up. My apologies if this starts getting a bit confusing - there are a lot of surfaces being ‘blended’ and ‘transitioned’ - I hope everything comes across clearly.
This is a short series on shaping the arm rests. It will be followed by a longer series on shaping the crest rail - I will post that one within the week.
The photo above shows the chair on its side resting on an 8/4 Douglas Fir plank clamped to my bench. This is a great set-up to give you access to 3 sides of the chair. The first step is to blend the joint between the inside of the arm and the back leg as well as the inside of the arm and front leg.

You can see a faint white pencil crayon line about 1/4" in along the top of the arm rest. When I am blending this joint, I am tilting it down to just touch this line - you can see this in the photo below.

(the blended joint)

The joint between the front leg and the arm is done the same way - blended until the inside of the arm is flush with the inside of the front leg. It is just touching the inset white pencil crayon line. Click the photo above to see these 2 areas. Once these 2 areas are defined, the space between them can be worked on (with spokeshaves). This area ends up being a flat surface that starts out almost vertical where it joins the back leg, but slowly twists as it gets closer to the front leg. You can see this a little more clearly in the photo below (which is out of sequence, but shows the twist well). Also, note the white pencil crayon layout lines on the front of the arm rest.

With these 2 joints blended and the angle on the inside of the arm established, it is time to start shaping the top of the arm. This whole process is broken down into smaller, simple stages. I rely on accurate layout lines and consistent reference points and surfaces.

The white pencil crayon line on the inside of the arm was created using a template to ensure consistency from one arm to the next and one chair to the next. You can also see a second white pencil crayon line on the top of the arm, more or less in the middle. this line follows the line established before the flare on the outside edge of the arm (you can see it a little clearer in the photo below).

I used 3 different half-round rasps to transition from the back leg into the inside top of the arm. The above photo shows where the rasp shaping stopped.

A longer view to see where things are at and to also show the white pencil crayon lines.

The rest of the shaping to the inside top of the arm is done with spokeshaves.

(another view)

(and another)

The outside top of the arm is done the same way - rounding everything from one pencil crayon line to the other.

This is a close up of a section of the front leg between the seat and the arm rest. This area is not flat, it is slightly domed. This maintains a crisp visual edge but keeps that edge away from the person sitting in the chair. If you click on the above photo - you can see the pencil lines that I am working to. You will notice that I have already rounded over the area right by the seat. This was done using a file with a safe edge - allowing me to work right into the corners. The line on the sides is offset by about 1/8" and tapers to nothing where it ends at the arm rest. I also draw a center line in the middle of the leg to keep the domed shape symmetrical.

The photo above is an attempt to show the amount of radius to the inside of the front leg. Notice how it tapers to nothing just under the arm.

A quick shot to show the fully rounded over inside front leg.

With the chair upside down on the Douglas Fir plank, I can work on the underside of the arm. Here I am using a paper template (made from the first completed chair) to layout the underside of the arm that transitions in to the back leg.

You can see the pencil lines clearly as they transition into the leg. From here - it is simply a matter of removing the material between the two reference lines. Unfortunately - I did not get a clear shot of how this looks once it was completed but you can get a sense of it in this photo below - from the first chair.

Shaping the crest rail will follow shortly.
And now - back to planemaking for a moment...
I have finished 2 shoulder planes recently. One is infilled with Honduran Rosewood and the other with Ziricote. This was the first time I have used Ziricote and I have to say - it was a really nice material to work with. That, and it looks pretty awesome. Here are a few photos of the 2 planes.

The Honduran Rosewood filled plane has steel cross pins and the Ziricote plane has brass pins.

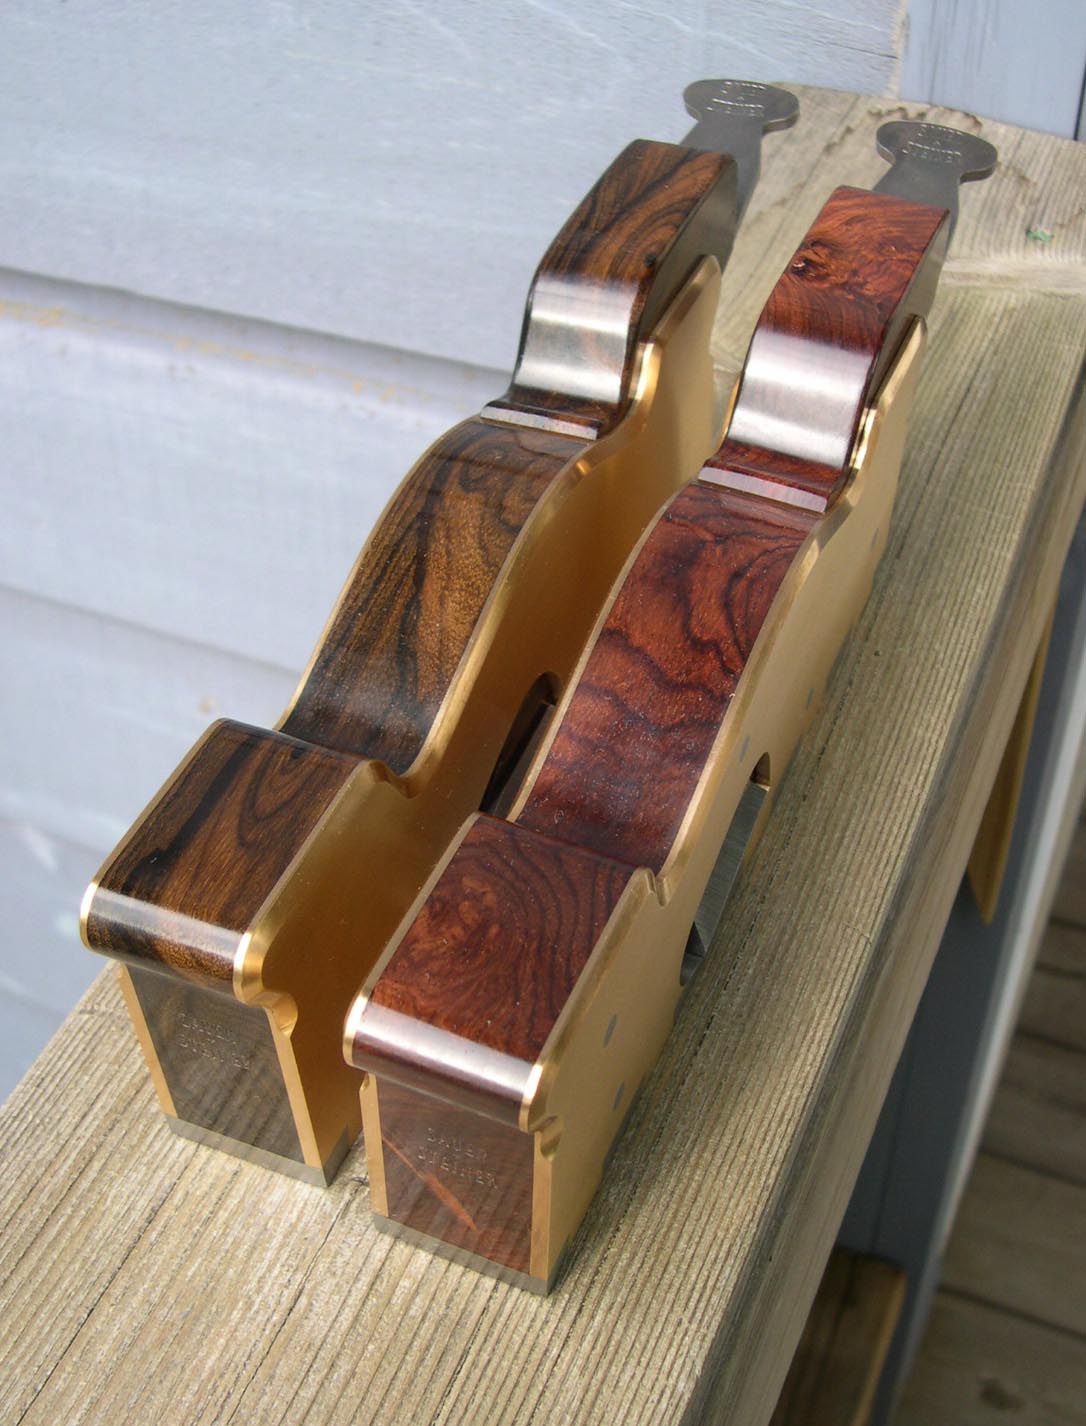


Some pretty amazing figure in the wedge!


posted by Konrad at
08:40
7 Comments
![]()


7 Comments:
As always gorgeous planes Konrad. The chairs look awesome. I now have an overwhelming erge to use a rasp on something, Haha.
Cheers
HC
Thanks Konrad for sharing this detail. Especially appreciate you walking through the process of blending the joints and then connecting the lines with spokeshaves. Seems like something I might have figured out after a good bit of trial and error, but it's so helpful to see it demonstrated.
George
The chairs are looking really great, Konrad. Thanks for posting so much detail.
Cheers ;-)
Paul Chapman
Thanks Hans. Rasps on endgrain works wonderfully - did you try it:)
Cheers,
Konrad
Thanks George. Glad you found the post helpful. I hope the next entry is helpful as well.
Cheers,
Konrad
Hi Paul - you are most welcome - glad you enjoyed it.
Cheers,
Konrad
I dont actually own any working rasps. Going to need to get me some vefore i can rasp something (can one use rasp as a verb i dont know) anyhow. Your next post makes me want to rasp even more lol.
Cheers
HC
Post a Comment
Subscribe to Post Comments [Atom]
<< Home