
Dining chair - one down... 5 to go.

The first ‘sitting’ in the chair was quite promising, so I kept going.
Fitting the piece for the backrest was first. There was a bit of trial and error with the backrest, but it went fairly smoothy. I opted to use 3 Dominos in each end to connect to the back legs. Cutting the Dominos in the backrest was easy - the really tricky part was how to index the locations on the back legs. With some careful layout lines, it worked - at least on this first chair.
The next step was the arm rests. These were also challenging from an indexing/locating standpoint. I used a single Domino oriented vertically to connect the arm rest to the back leg. The front of the arm rest is connected with a 1/2"D, 2" long dowel. The photo above shows the 2" thick over-sized arm blanks in the correct position with the Dominos and dowels in place. It was time to start thinking about removing some of the bulk and doing some more shaping.
I really wrestled with just how much shaping to do before the glue up. On the one hand, parts were way easier to shape before they were glued - but if I inadvertently removed too much material in any spot - it could spell disaster. I was also nervous about the fact that this was a very unfamiliar process, building a very unfamiliar form. I opted to play it safe and only wasted out what I was absolutely certain about.
The back rest struck me as a pretty safe place to do some shaping. There was a lot of material to remove from the blank, and the joint between the leg and the backrest would be really tricky to access once it was glued. Below are 3 shots of the rough shaping.


You will also notice the heavy chamfer to the back leg - just behind the back rest. This was another area that would be really difficult to get to once it was glued up, so I did it before hand.

I also refined the shape of the arm rests. I left the top flat to allow for clamping. I did shape the underside of the arms before glue-up. I used the RAS for this and took advantage of the radius to scoop it out.

I also further refined the front edge of the seat to make it look a little thinner. The above photo shows the thinned out seat edge.
At this point, I was pretty comfortable with how much I had refined the shapes and did not want to push my luck. Time to glue it up.

The complexity of this chair became apparent as I planned for the glue-up - and the advantage of screws became crystal clear. I had to glue the arm rest at both ends and then install both legs onto the seat at the same time. And glue one end of the back rest... and have the other two legs in position in order to index everything and give myself proper clamping surfaces.
The above photo shows the first glue-up. You can see the vertical Domino in the back leg. I had to make another pair of clamping pads for the top of the back legs to allow for even clamping pressure to glue the back rest. The first glue up worked well, as did the second and final one. Phew!

Riley was the first person to try the chair all glued up.
Now for the stage I was most looking forward to - the final shaping.

The first day of shaping was pure bliss. I was armed with a pair of spokeshaves and a small army of (left handed) Auriou rasps. The shaves were marvelous shaping tools and made quick, tear-out free work of the curly walnut. For those areas the shaves could not get to - I used rasps.


Jill took a few action shots.

I kept the mock-up close at hand - you can see it in the background.

You can get see the cross section of the legs by looking at the ends. You can also see the scooped out underside of the arm rest.

This felt a little weird - but it was the best way to shorten the arms by 3/8".
There was one aspect to this chair that I did not fully resolve in the mock-up and I hoped I would be able to figure it out by the time I needed to. It had to do with the three way joint where the arm rest meets the back leg - right where the back rest joins the back leg. The ‘armpit’.
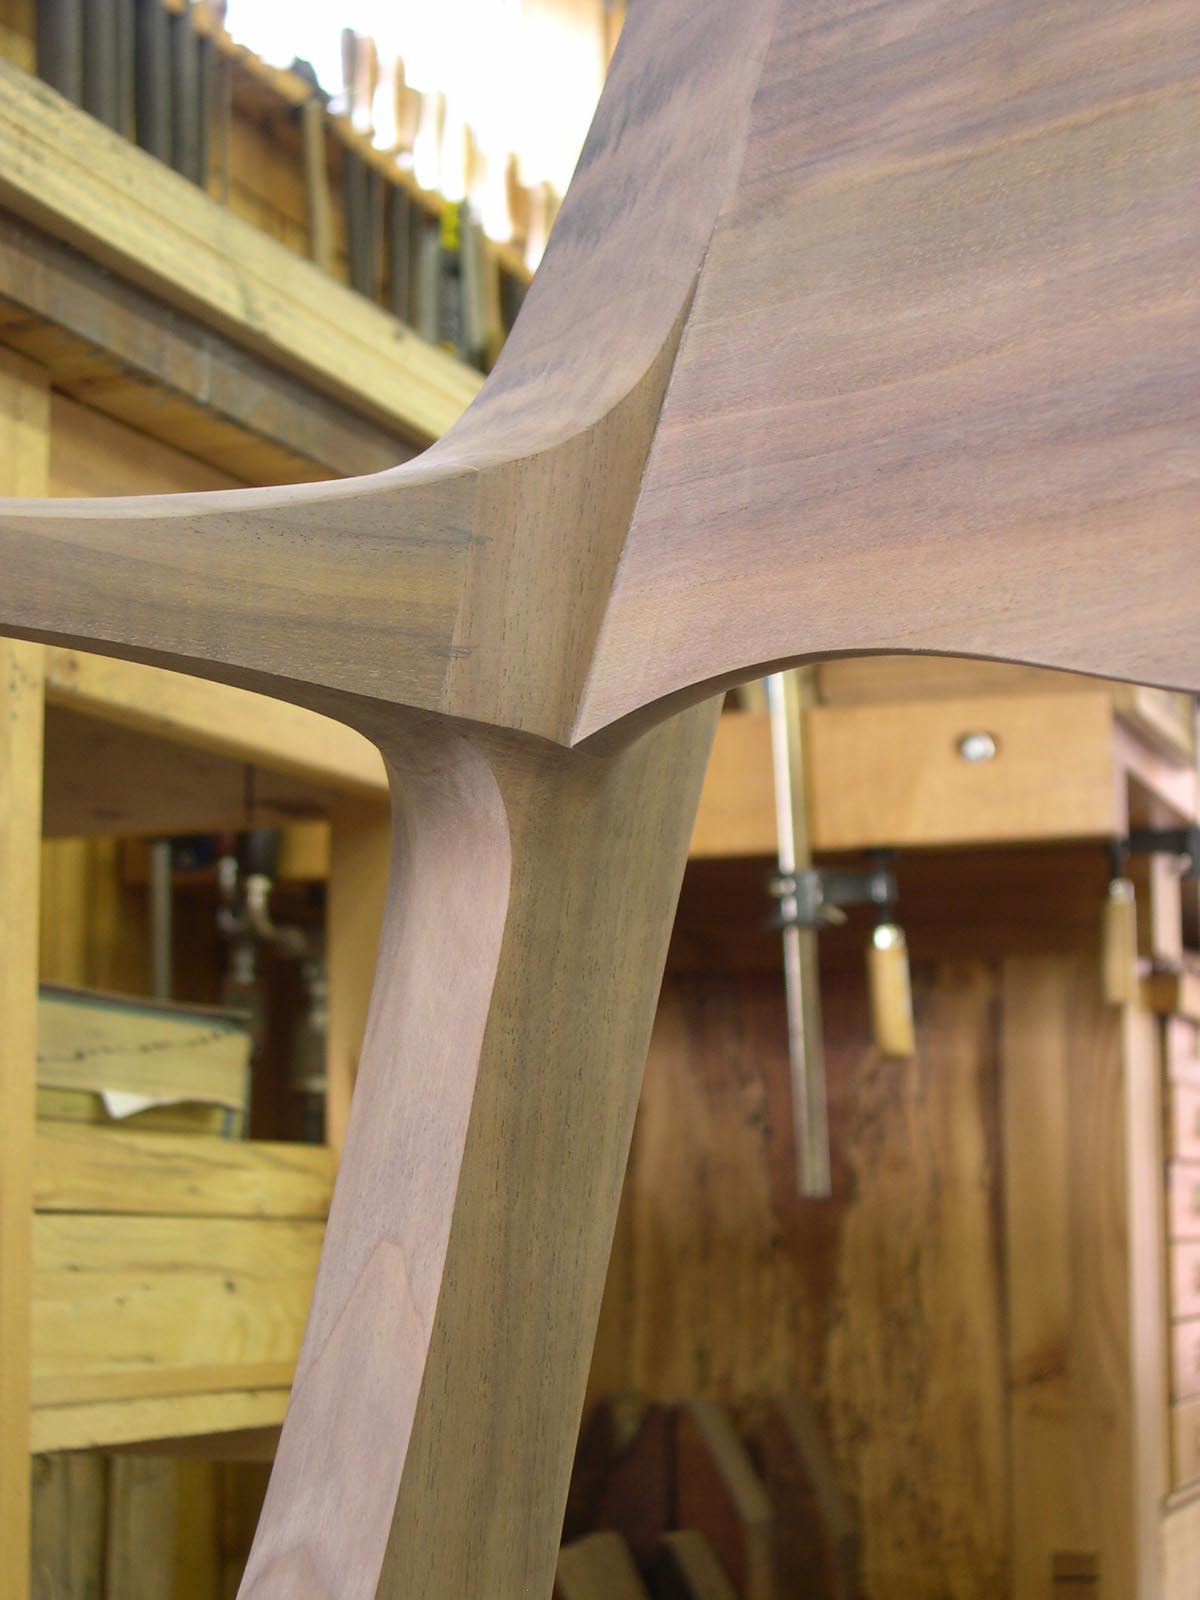
In the above photo - you can see how it looked. It was not a smooth transition - but I was not totally clear with how to resolve it. I had hoped that during the clean-up stage, it would just come to me. No such luck.
So I called my good friend Pat for some help. Pat had been along for the chair-making ride since the beginning. There is a very long list of things that I admire about Pat, but in this particular case, I was after his ability to see. In his typical polite way - he found this weakest aspect to the chair and called me on it. It was the reminder I needed (and was looking for) not to settle. We spent at least an hour on the phone talking through possible solutions and the overall design of the chair. I hung up the phone with a few ideas, a renewed sense of hope and gratitude for his help.
I realized that the problem with this area was the three converging elements were all competing for equal amounts of attention. One of the intersections needed to be visually dominant in order for it to work. As soon as I realized this - the solution was quite clear. The connection between the back leg and the arm rest had to be dominant - the back rest to back leg connection was secondary.

I did a quick test to the mock-up to see how it would look. Other than the fact that the Domino broke through :) - it looked pretty good. Just to be certain, I did another test in Photoshop. Way easier to move a few pixels around than to add wood!
 (above - the photoshop altered test)
 (the finished transition)
The photo shop image did it for me and I carefully proceeded to make the change to the chair. I was sweatin it though - worrying about the Domino breaking through. Thankfully it didn’t, and I was quite happy with how it worked out in the end.
With all the shaping done it was time to move to the sanding stage. I was warned by several people that this was by far the worst part of making one of these types of chairs... the countless hours of sanding. I had finished the shaping stage with fairly fine files, and was hopeful that I could start with a fairly fine grit of paper. I started with 180 grit which seemed to be ok. The 180 took many hours but each grit after than went increasingly quicker. It reminded me of using waterstones - the 1000 grit stone does the bulk of the work.
I mixed my own Maloof type finish - 1/3 tung oil, 1/3 linseed oil and 1/3 varnish (P&L 38 to be specific). 8 coats later - the chair was done. Click on any of the images for a larger view.


We have been enjoying the chair for the last 3 weeks now and I am pleasantly shocked that there is only one change that I will make to the remaining 5 chairs. I will remove a bit more material from behind the pommel - the ridge in the middle of the seat. It transitions nicely now, but if you slouch in the chair to read the paper for example, you can feel a bit too much of the transition into the pommel. Other than that though - it is quite comfortable. It is also heavier than I would like - but I am not sure how to resolve this. Part of it may be the fact that this was unusually heavy walnut - but I suspect I could have started with thinner stock for the seats.
There are quite a few people to thank for contributing to this project. The 20 or so family, friends and neighbours who generously lent their posteriors to make sure the chair was comfortable.
And two special thank-yous. To Pat for all his thoughtful insight and for not letting me settle. I have always appreciated the fact that we can be on opposite sides of the continent and yet have very meaningful design discussions. And to Derrick - who generously fielded all my emails and phone calls and provided insight into the process.
And now for the other 5...

But before I get to these - I have quite a few planes to get to. I have been busy in the shop working on several planes - including this one...

posted by Konrad at
08:16
24 Comments
![]()


24 Comments:
Konrad,
truly exceptional workmanship. that's an amazing beginning for your first chair. I'd be happy if i could produce something like that at the end of my career. Ah man i feel so inadequate now....
High Five*
Tyler
Nice chairs Konrad,
Love the shot looking down on the crest rail to back leg transition with the arm to back leg tranny below.
What do you think of the Maloof finish vs. shellac?
Need to chat with you about a A 4 smoother.
You done good, Konrad. Amazing results for a first chair. I'm sure Sam Maloof would be impressed.
I can't figure out how you simultaneously connected the arm rest, a dowel on the underside of it from the front leg post, to the rear post with the domino. Is there enough play in the rear, vertical, domino slot?
Great insight into how your thought process works. Challenge is to keep the others more or less "identical", but with an organic form like that, I would think viewing each one as a unique form of sculpture helps to accept the subtleties from one to the next - at least that's what I keep telling myself on my chair carving expedition.
Hey Tyler,
Thanks for the kind comments but I gotta tell ya - your work is pretty impressive.
http://tealandgold.blogspot.com/
Cheers,
Konrad
Thanks Chris.
I like that view too. To be honest, the Maloof finish took a while to figure out. I am hoping it goes faster on the remaining chairs. It makes french polishing planes seem fast. It does produce a really warm soft to the touch finish though - something really nice in a chair. Not 100% sure about the double oil content either... I may tinker with it a bit.
An A4 smoother... have’t made one of those in a long time. Just let me know.
Cheers,
Konrad
Thanks Tico.
The glue up was a very stressful process - and I hate glue-ups to begin with. You are exactly correct - the arm had to be attached at both ends before the legs could be attached to the seat. I think I will get Jill or someone else to help me with this next time - doing it by myself was stupid in hindsight - I got lucky that nothing screwed up. There is zero play in either the Domino joint or the dowel... but the dowel did allow a wee bit of swivel motion which helped when I had to line up the dowels. Yeah - it was pretty stressful:)
Cheers,
Konrad
Thanks Richard.
I am hopeful that I will be able to keep them consistent. I was encouraged by how consistent the roughing out of the 5 seats went. I have since done the shaping with the RAS and the ROS sanders and they look pretty good. Although, I am going to double back and take a bit more material out behind the pommel. I will be going through white pencil crayons like mad:)
How is the table coming along?
Cheers,
Konrad
Wow, simply Wow!! You are the man, I mean I'm amazed by the work you do! It will be absolutely interesting to read about your work... if you ever end up writing a book about it!
Cheers
I'm a fan!
Looks lovely, Konrad. Very tactile, which is how a chair should be.
Cheers ;-)
Paul Chapman
You rocked this one my friend. Outstanding...and compared to watching the dvd, know that the use of hand tools over power tools prevailed in giving it that extra touch of wow... never mind the bling factor of that walnut, exceptional...... you should be proud my friend!
Hi Konrad,
Just brilliant, I love the chair, your work and postings are so inspiring, as I start reading I just get drawn in deeper.
keep up the great work.
Jamie
Great looking chairs!
Maybe you could make the legs hollow to make them lighter?
Nice work Konrad. Love the way your chair has taken shape It's like a Maloof-Wegner love child. Light but solid. Just the right balance of hard and soft lines.
...and that wood. damn.
Cheers,
Niels
Konrad,
Awesome. Love it.
Lee
Beautiful chairs. The finish is superb, it really compliments the design of the chairs.
Thanks David.
boy... this book writin topic has come up a few times now. I am quite flattered and maybe I had better give it a bit more serious consideration. Thanks for the vote of confidence.
Cheers,
Konrad
Thanks Paul. It is nice and tactile. The best sign is once people have sat in it for about 10 minutes their hands start wandering all over the arms, legs and seat:)
Cheers,
konrad
Thanks Jim. Yeah - it was a lot of hand work but there were some power tools in there too. The RAS was an absolute blessing for removing material from the seat. But I do prefer the control and accuracy of my Boggs shaves and Auriou and Fukazawa rasps.
Cheers,
Konrad
Thanks for the kind comments Jamie. Glad you are enjoying the posts - and if inspiration is the result - I am most pleased.
Cheers,
Konrad
Hi Niels,
Thanks for the kind comments.
I was gathering up the rather mountainous pile of off-cuts this morning and was almost in tears. All that curly waste! Thankfully - I have a line on another figured walnut log... hopefully that one follows me home too:)
Cheers,
Konrad
Thanks Beachcricket.
I have to admit - I was intrigued by your name and followed it to your blog. Cricket bat making... how cool is that! It had never really occurred to me before, but of course one could make a cricket bat. Thanks for the comments and opening up yet another door to the amazing world of people making great things.
Cheers,
Konrad
Hello Fredrik,
Glad you like the chair. Making the legs hollow - an interesting idea. Not sure how to do that to be honest - what did you have in mind?
Cheers,
Konrad
Thanks Lee.
Cheers,
Konrad
Post a Comment
Subscribe to Post Comments [Atom]
<< Home